Hi! My name is Salvador and I’ve been trying to integrate the Metis M.2 on a Jetson Orin NX 16GB to perform Computer vision tasks.
Recently the Axelera team shared a guide to Bring up Metis M.2 on Jetson Orin, where they explain the steps required to modify the kernel to use the Metis Accelerator.
For me these changes were not enough, so I had to perform additional steps to make it work, I hope this post is useful for anybody trying to accomplish the same. The following steps build upon the instructions provided by the Axelera team.
Prepare the Nvidia files necessary
We will use a host machine running Ubuntu 20.04 or 22.04 (newer versions are not compatible with some Nvidia tools) where we will run all the described process, download the kernel sources, the Jetson Sample Filesystem, and the Jetson linux toolchain, and execute the cross compilation of the linux kernel, and the flashing into the Jetson Oring NX.
To install the Jetson toolchain just follow the instructions provided on the link.
Once installed, the Jetson toolchain needs to export a variable pointing to the cross compiler:
Assuming you installed the tools at $HOME/l4t-gcc
export CROSS_COMPILE=$HOME/l4t-gcc/aarch64--glibc--stable-2022.08-1/bin/aarch64-buildroot-linux-gnu-
Download the files and extract them in a proper directory, say, ~/latest_jetson.
mkdir ~/latest_jetson
cd ~/latest_jetson
# Download the Sample filesystem:
wget https://developer.nvidia.com/downloads/embedded/l4t/r36_release_v4.4/release/Tegra_Linux_Sample-Root-Filesystem_r36.4.3_aarch64.tbz2
# Download the Jetson Pre-compiled Driver Packages
wget https://developer.nvidia.com/downloads/embedded/l4t/r36_release_v4.4/release/Jetson_Linux_r36.4.3_aarch64.tbz2
# Download the L4T Kernel sources:
wget https://developer.nvidia.com/downloads/embedded/l4t/r36_release_v4.3/sources/public_sources.tbz2
Our directory will look like this:
~/latest_jetson$ ls
Jetson_Linux_r36.4.3_aarch64.tbz2 Tegra_Linux_Sample-Root-Filesystem_r36.4.3_aarch64.tbz2
public_sources.tbz2
Now extract the files in the following order:
tar xf Jetson_Linux_r36.4.3_aarch64.tbz2
mkdir Linux_for_Tegra/rootfs
tar xf Jetson_Linux_r36.4.3_aarch64.tbz2 -C Linux_for_Tegra/rootfs
tar xf public_sources.tbz2
The we get inside the Linux_for_Tegra/source directory and expand the following files:
tar xf kernel_src.tbz2
tar xf kernel_oot_modules_src.tbz2
tar xf nvidia_kernel_display_driver_source.tbz2
After this our directory will have a bunch of files inside, which are the kernel and tools necessary for building and flashing our customized kernel.
Here is where the fun begins!
Update and get the necessary tools:
sudo apt update
sudo apt install -y build-essential bc flex bison libssl-dev zstd git
Now download the axl-jetson.patch from the Bring Metis up on Jetson Orin post and copy it into the kernel source directory:
cd ~/latest_jetson/Linux_for_Tegra/source/kernel/kernel-jammy-src
cp ~/Downloads/axl-jetson.patch .
Apply the patch:
patch -p1 < axl-jetson.patch
The step above will add the following configs into arch/arm/configs/tegra_defconfig and arch/arm64/configs/defconfig
# DMABUF options
CONFIG_SYNC_FILE=y
CONFIG_SW_SYNC=y
CONFIG_DMABUF_HEAPS=y
CONFIG_DMABUF_SYSFS_STATS=y
CONFIG_DMABUF_HEAPS_SYSTEM=y
CONFIG_DMABUF_HEAPS_CMA=y
And will also modify drivers/pci/controller/dwc/pcie-designware.h increasing the LINK_WAIT_MAX_RETRIES from 10 to 50:
#define LINK_WAIT_MAX_RETRIES 50
Now what is additional to the steps provided by the Axelera team, is that we need to configure the kernel flags pertaining DesignWare using the make menuconfig, still inside the kernel-jammy-src directory:
make ARCH=arm64 O=kernel_out menuconfig
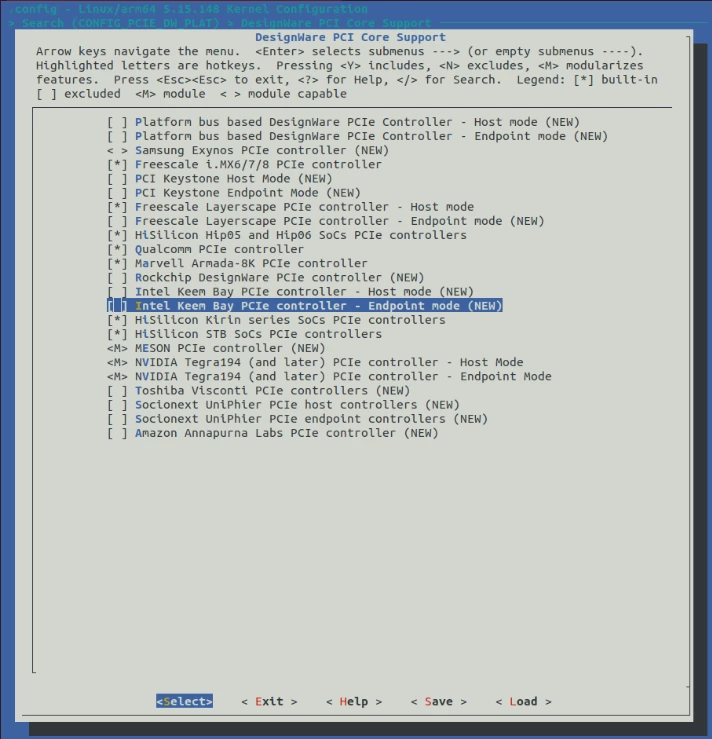
Once the menuconfig is open, use the forward slash / to trigger the search and type CONFIG_PCIE_DW, then hit enter. You will see something like this:

Mark with the space tab the topmost option: Platform bus based DesignWare PCIe Controller - Host mode (NEW). And leave unselected the below option, Endpoint mode.
Save the config by navigating using the left and right arrow keys. It will create a .config file that will be used by the kernel compilation.
After making these modifications now we can proceed to build the kernel:
cd ~/jetson_custom/Linux_for_Tegra/source
mkdir kernel_out
./nvbuild.sh -o kernel_out
This step will take a long time, so you may want to take a break and stretch a bit ;)
Once all compiles you will have the kernel compiled at kernel_out/.
Now its time to install the kernel:
sudo ./nvbuild.sh -o kernel_out -i
This step will take some time, too.
After the compilation and installation of our custom kernel successfully ends, copy the generated Image and DTB for flashing:
cp kernel_out/kernel/kernel-jammy-src/arch/arm64/boot/Image ../kernel/Image
cp -r kernel_out/kernel/kernel-jammy-src/arch/arm64/boot/dts/nvidia/* ../kernel/dtb/
Optionally you may want to keep this kernel with a custom name like Image.custom, so when the sudo apt update is run, it does not break you kernel.
Now proceed to flash the board following the instructions provided by Nvidia.
export L4T_RELEASE_PACKAGE=Jetson_Linux_<version>_aarch64.tbz2.
export SAMPLE_FS_PACKAGE=Tegra_Linux_Sample-Root-Filesystem_<version>_aarch64.tbz2.
export BOARD=jetson-orin-nano-devkit-super
The exact BOARD value depends on you Jetson model, you can find it here.
Proceed to flash the board:
sudo ./tools/l4t_flash_prerequisites.sh
sudo ./apply_binaries.sh
Now put your Jetson developer kit into Force Recovery Mode.
For the Jetson AGX Orin developer kit:
- Ensure that the developer kit is powered off.
- Press and hold down the Force Recovery button.
- Press, then release the Power button.
- Release the Force Recovery button.
For the Jetson Orin Nano developer kit:
- Disconnect the power cable to ensure that the developer kit is powered off.
- Place a jumper to short the REC and GND pins on the 12-pin button header.
- Reconnect the power cable.
- Confirm that the developer kit is in Force Recovery Mode by following the procedure To determine whether the developer kit is in force recovery mode.
Enter this command on your Linux host to install (flash) the Jetson release onto the Jetson developer kit. Depending on your installation medium (NVMe, USB, SD) it will be different, and also depending if the Jetson board super mode is active or not. For me I’ll install via USB on for Jetson Orin NX in super mode:
sudo ./tools/kernel_flash/l4t_initrd_flash.sh --external-device sda1 \ -c tools/kernel_flash/flash_l4t_t234_nvme.xml -p "-c bootloader/generic/cfg/flash_t234_qspi.xml" \ --showlogs --network usb0 jetson-orin-nano-devkit-super internal
Wait for a long time while the Jetson gets flashed. After it finishes, turn off the Jetson, remove it from recovery mode and turn it on again to continue with the Ubuntu user account creation and the rest of the installation on the Jetson.
Now proceed to install the Voyager-sdk normally as indicated by the Axelera team.
If you get issues to recognize the Metis drivers after installation follow this guide:
https://support.axelera.ai/hc/en-us/articles/29335553753874-Build-and-load-Metis-driver-on-host-manually
Or this one:
https://support.axelera.ai/hc/en-us/articles/29308064843794-How-to-solve-Metis-driver-failure-to-persist-after-host-reboot
Useful docs:
https://docs.nvidia.com/jetson/archives/r38.2/DeveloperGuide/SD/Kernel/KernelCustomization.html
https://docs.nvidia.com/jetson/archives/r36.4.3/DeveloperGuide/IN/QuickStart.html
https://developer.nvidia.com/embedded/jetson-linux-archive
I will add samples on how to run inference on another post.
Thanks for reading!


