
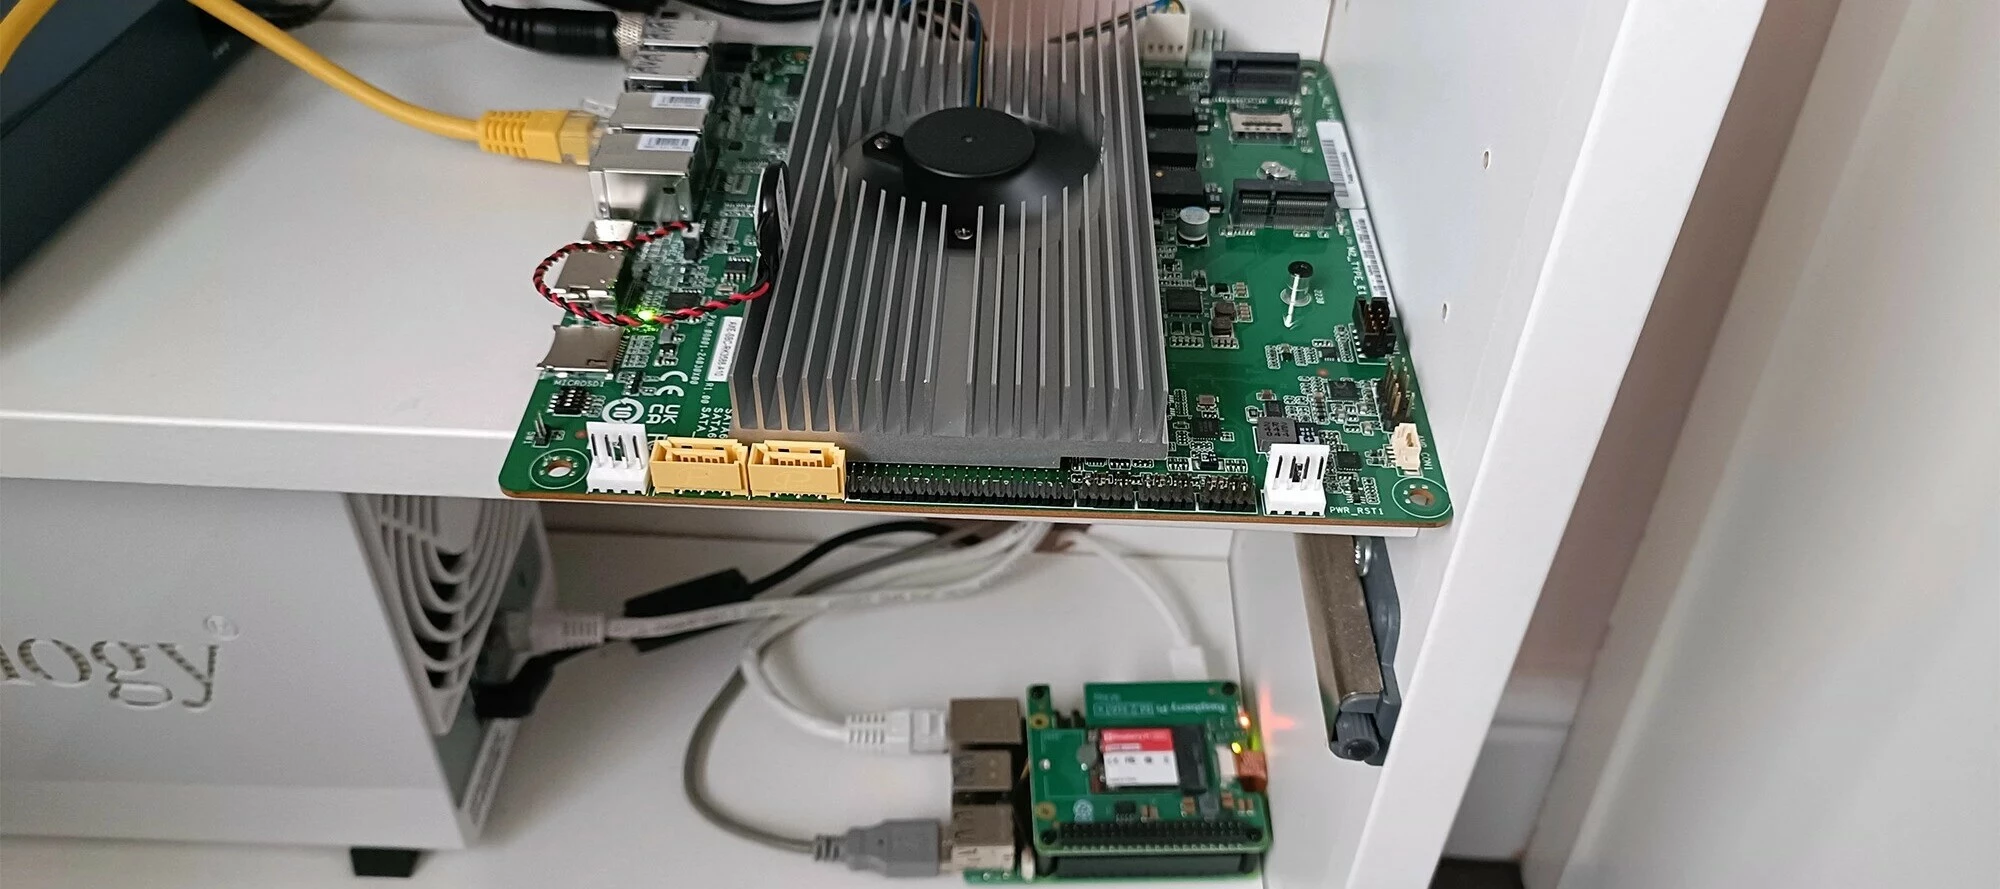


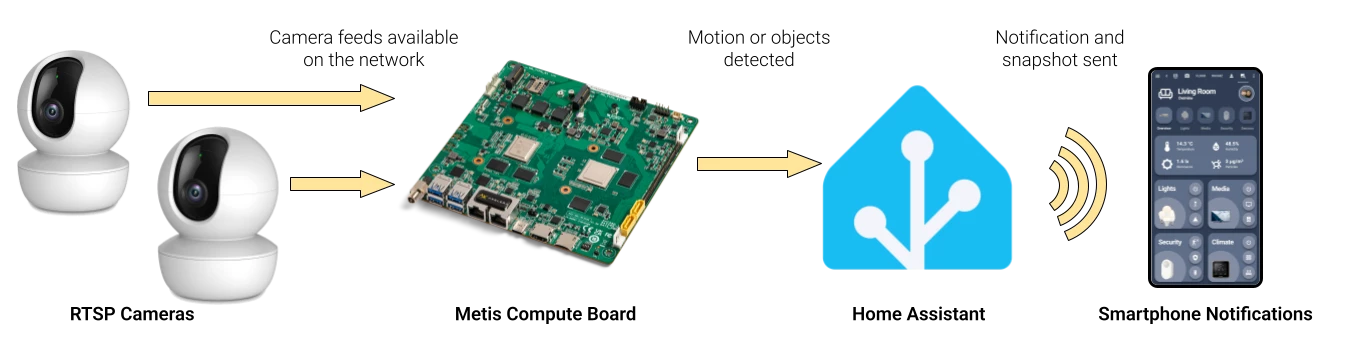
I've been running Frigate on a Raspberry Pi 5 for CCTV object detection, but the poor Pi's fan runs constantly trying to keep up with two 1080p cameras. So I've offloaded the detection to a Metis Compute Board (MCB) with zone filtering to reduce spam notifications from the road outside.
It triggers Home Assistant automations via webhooks, sends notifications with snapshots to my phone, runs headless with auto-start on boot, and uses the official Voyager SDK Python APIs.
Note: I suck at coding, so don't judge the Python script! Improvements are welcome as forks in GitHub, natch.
What You'll End Up With
- Metis hardware running yolo26s-coco-onnx doing all AI detection (low latency, low power)
- Custom zone detection (alert when someone enters your driveway, ignore the pavement)
- Home Assistant handling notifications and snapshots
- Phone notifications with high-res snapshots within 1-2 seconds
- Everything running headless, auto-starting on boot, entirely local
~30 FPS combined across two cameras with ~196ms latency. No fans screaming, no thermal throttling.
What You'll Need
- A Metis device (Compute Board, M.2, or PCIe)
- Voyager SDK 1.5+ installed and working
- Home Assistant with mobile app configured
- RTSP cameras on your local network
- SSH access to your Metis device
I'm assuming you've got Voyager installed, can run inference.py successfully, you’ve grabbed a model from the Axelera AI model zoon (I’m using yolo26s-coco-onnx, which is perfect for this application), and that you’re comfortable-ish with SSH.
Voyager SDK runs in Docker on the MCB, so you'll see Docker commands below. If you have an M.2 or PCIe Metis card, you might be running natively and won't need the Docker bits.
Part 1: Setting Up Home Assistant
Create Notification Toggle Helpers
Create toggle switches so you can turn notifications on/off without restarting. This isn’t essential, but I’ve found it to be really useful. I actually have separate helpers for each user, so everyone can configure whether they get notifications or not.
In Home Assistant:
- Go to Settings > Devices & Services > Helpers
- Click Create Helper > Toggle
- Create toggles like
user1_front_cam_notificationsfor each camera/user combination
Add Shell Commands to configuration.yaml
Add commands for high-res snapshots (ffmpeg grabs higher res frames than the default RTSP snapshot) and a cleanup script to scrub snapshots over three weeks old:
shell_command:
  snapshot_front: "ffmpeg -rtsp_transport tcp -i 'rtsp://admin:PASSWORD@192.168.1.10:554/path/to/stream' -frames:v 1 -q:v 2 -y {{ filename }}"
  snapshot_back: "ffmpeg -rtsp_transport tcp -i 'rtsp://admin:PASSWORD@192.168.1.11:554/path/to/stream' -frames:v 1 -q:v 2 -y {{ filename }}"
  cleanup_snapshots: "find /config/www/snapshots/ -name '*.jpg' -type f -mtime +21 -delete"
After saving: Developer Tools > YAML > Restart > Shell Commands.
Create Webhook Automations
Settings > Automations & Scenes > Create Automation > Create new automation
Switch to YAML mode and paste this in. You can use the UI too, but YAML saves lengthy explanations here. You can switch back to visual mode after pasting to adjust things a little more easily.
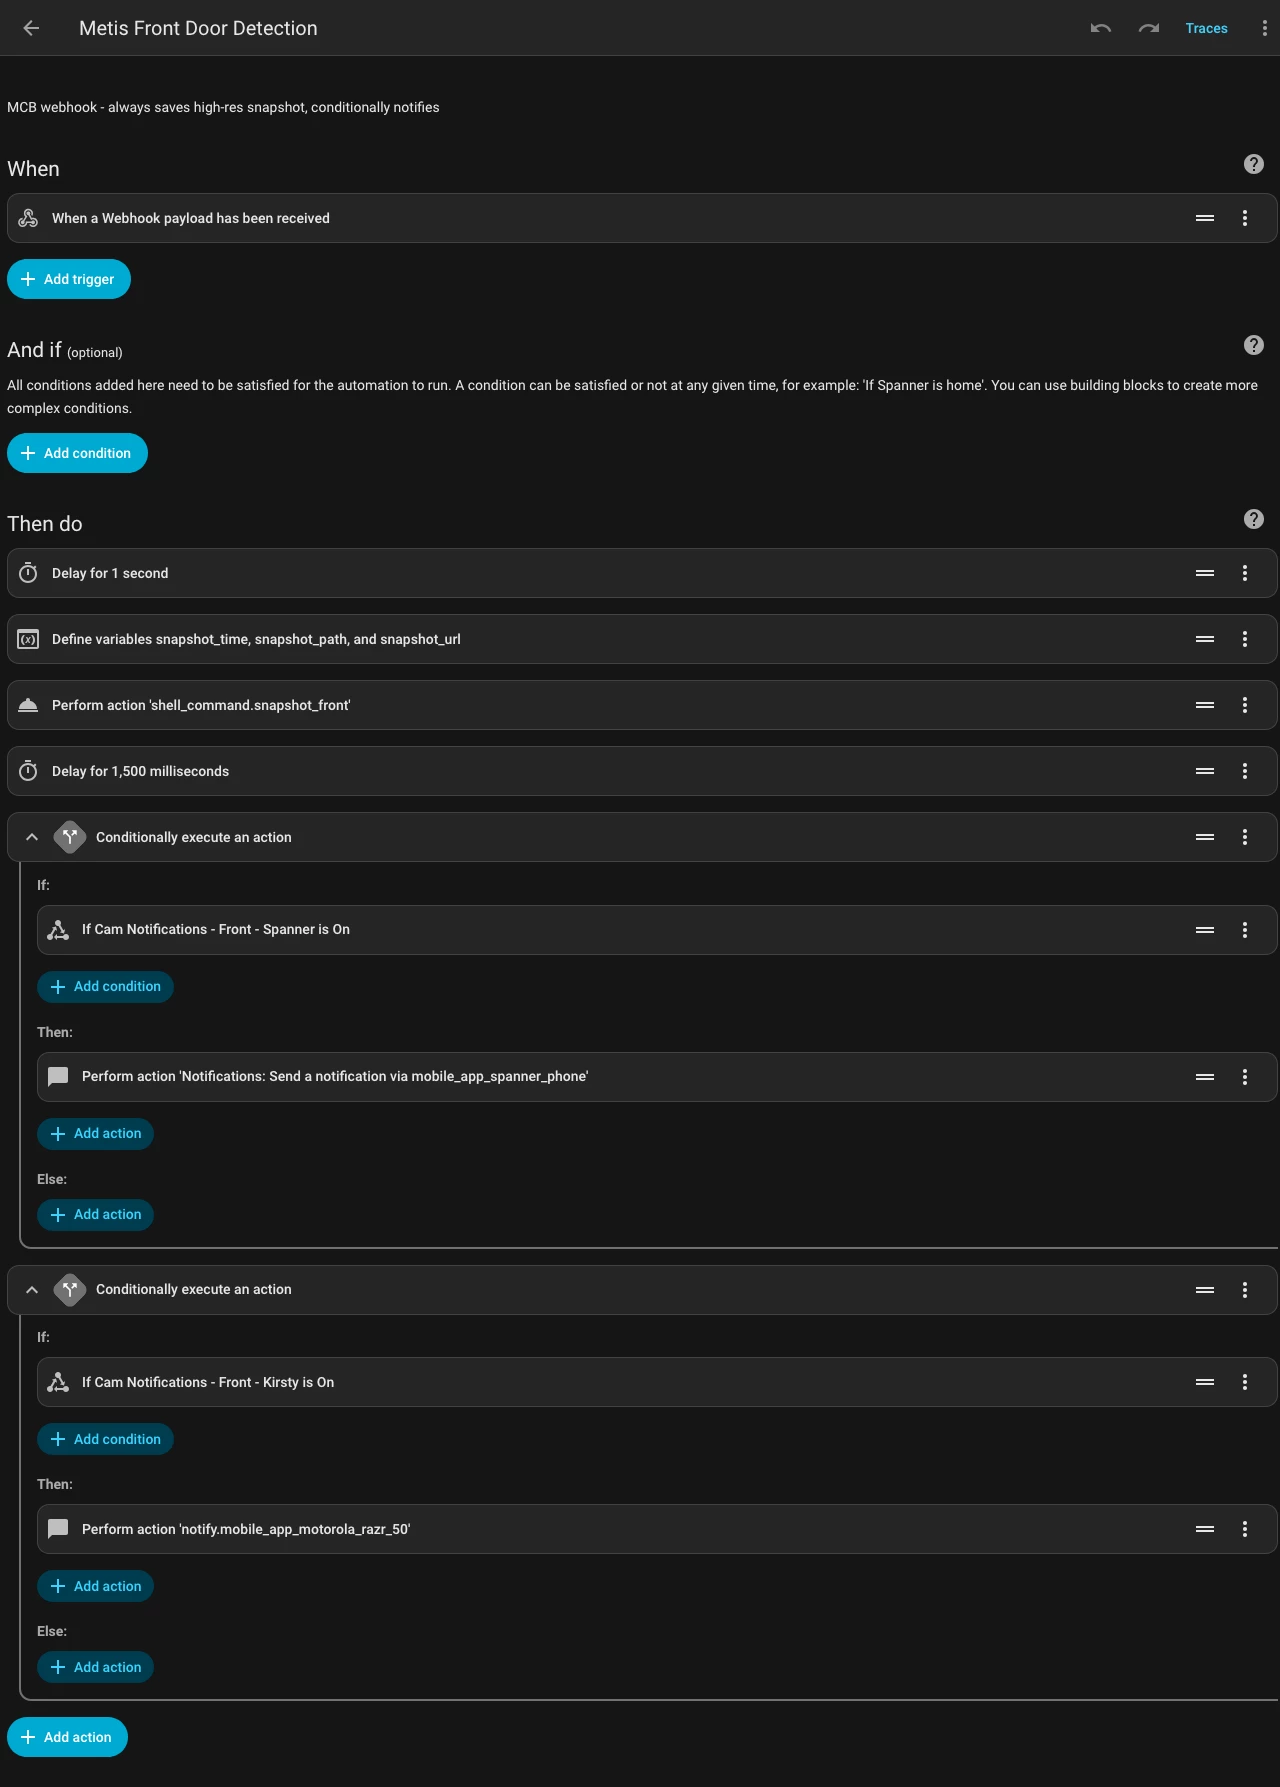
Key things to customise:
entity_id: input_boolean.user1_front_cam_notifications→ Your toggle helper(s)entity_id: camera.front_door→ Your camera entityaction: notify.mobile_app_user1_phone→ Your mobile notification service
Duplicate for each camera.
Then add the cleanup script as an automation that runs daily at 3 AM:
alias: Cleanup Old Metis Snapshots
triggers:
  - trigger: time
    at: "03:00:00"
actions:
  - action: shell_command.cleanup_snapshots
mode: single
Part 2: The Metis Detection Script
The script uses the official Voyager SDK Python API (create_inference_stream), based on the SDK examples.
SSH into your MCB and enter the Voyager SDK environment:
ssh root@YOUR_MCB_IP
cd /home/antelao
docker exec -it Voyager-SDK /bin/bash
cd /home/ubuntu/voyager-sdk
source venv/bin/activate
You should see (venv) ubuntu@antelao-3588:~/voyager-sdk$ or similar.
You can start with my clumsy, yet functional detection script from GitHub: Metis-Motion-Detection
Configure these values for your own setup:
# Home Assistant settings
HA_IP = "192.168.1.100"  # Your Home Assistant IP

# Camera RTSP URLs
FRONT_CAMERA = "rtsp://admin:PASSWORD@192.168.1.10:554/path/to/stream"
BACK_CAMERA = "rtsp://admin:PASSWORD@192.168.1.11:554/path/to/stream"

# Detection settings
FRONT_DETECT_CLASSES = ["person", "cat", "dog", "car"]
BACK_DETECT_CLASSES = ["person", "cat", "dog"]
CONFIDENCE_THRESHOLD = 0.5  # Lower = more sensitive
Create the script on the device:
cat > metis_ha_detector.py
# Paste the entire customised script in
# Press Ctrl+D when done
How the Script Works
- Uses
create_inference_stream()from Voyager SDK to set up camera inputs - Iterates through detection results using the standard SDK pattern
- For each detection, it extracts the object class (
.label.name) and confidence (.score) - Checks if the bounding box (
.box) overlaps with defined zones - If zone conditions are met, it POSTs to the Home Assistant webhook
The zone checking uses OpenCV's cv2.pointPolygonTest() and checks if any corner of the bounding box or the center point falls within the zone polygon. So the moment any part of someone (or something) enters the zone, it triggers.
Test run:
python3 metis_ha_detector.pyWalk in front of your camera(s) to confirm the pipeline works. Press Ctrl+C to stop it.
Part 3: Zone Configuration
Zone detection filters out spam alerts, like people on the pavement or cars driving past. I only want to know when someone crosses the property line, or if a car parks right outside it.
Understanding Coordinates
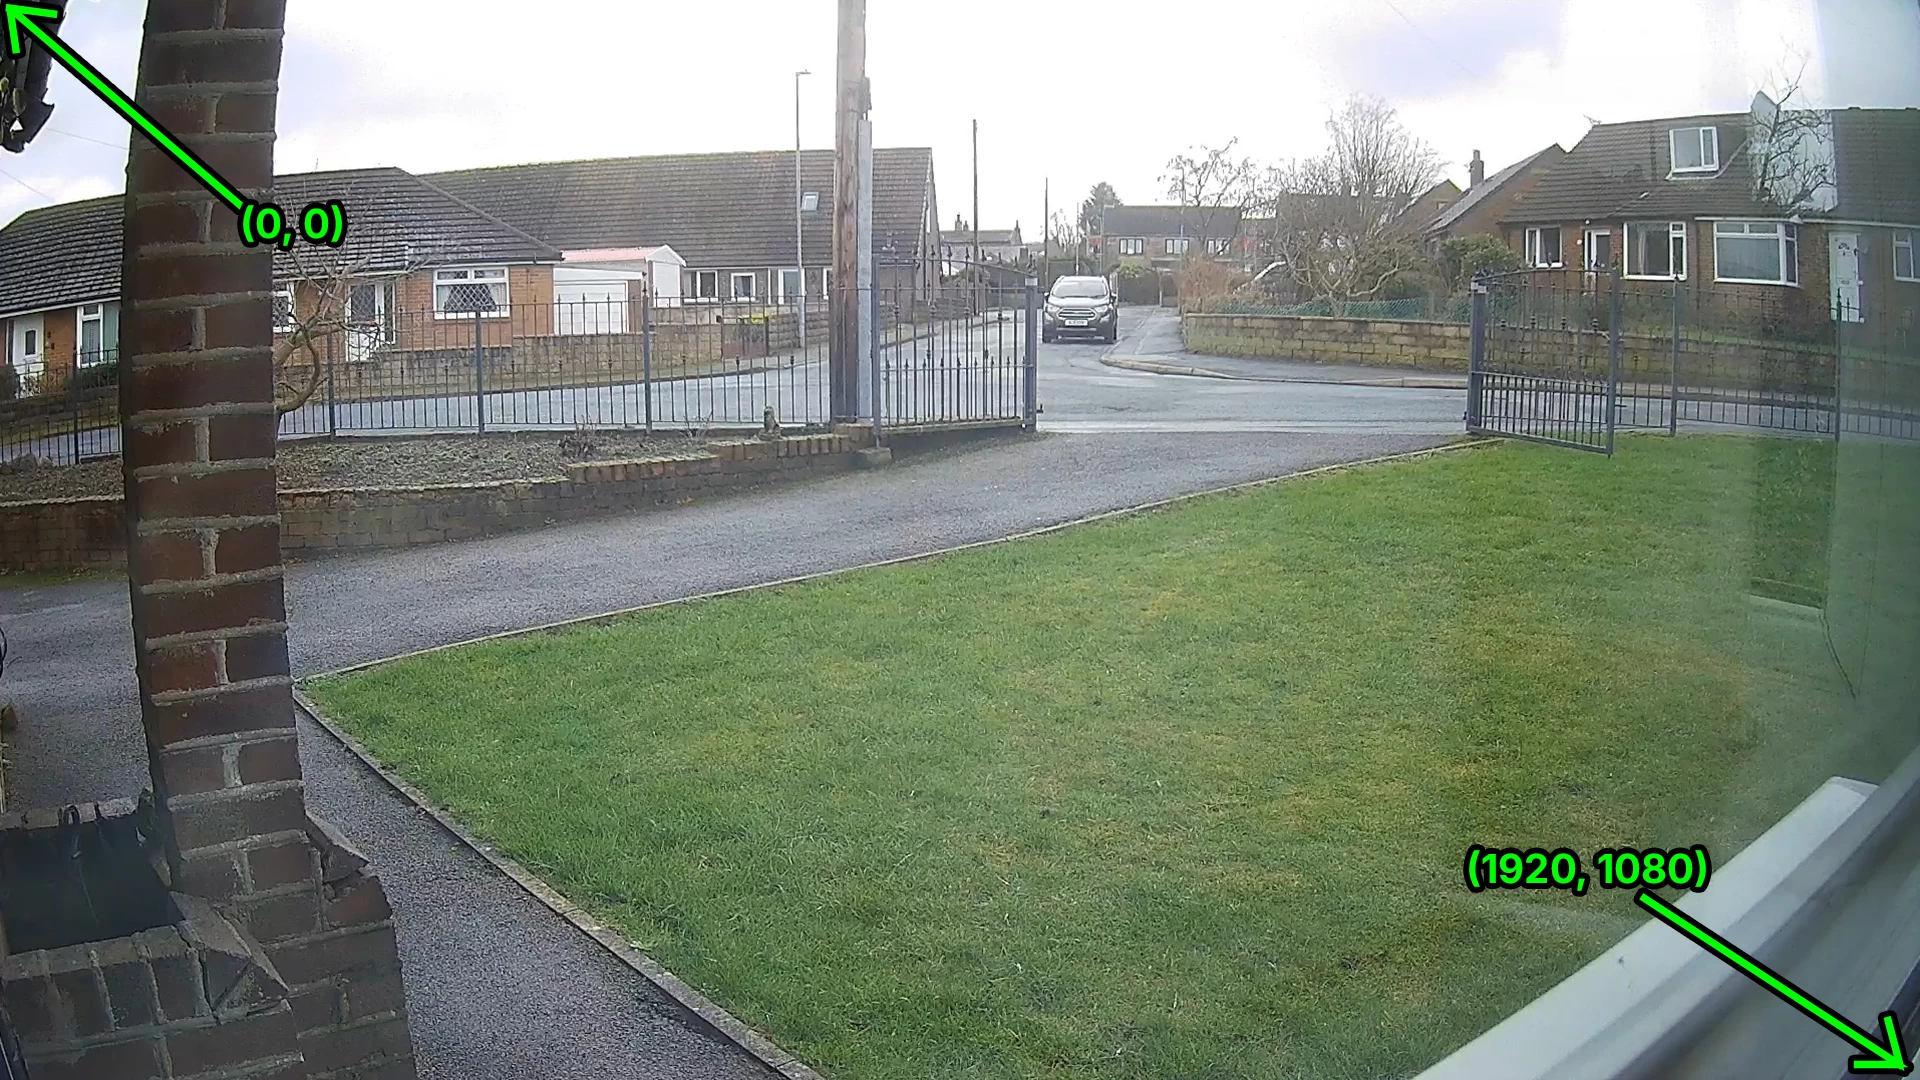
- (0, 0) is the top-left corner of the image
- (1920, 1080) is the bottom-right (for a 1080p camera)
- X increases going right, Y increases going down
Zones are defined as polygons: a list of (x, y) coordinates that form a shape.
Measuring Your Zones
- Take a screenshot from your camera (open the RTSP stream in VLC or something, and take a snapshot)
- Open it in an image editor (Photoshop, GIMP, Krita, whatever)
- Use the ruler/measurement tools to note pixel coordinates of your zone boundaries
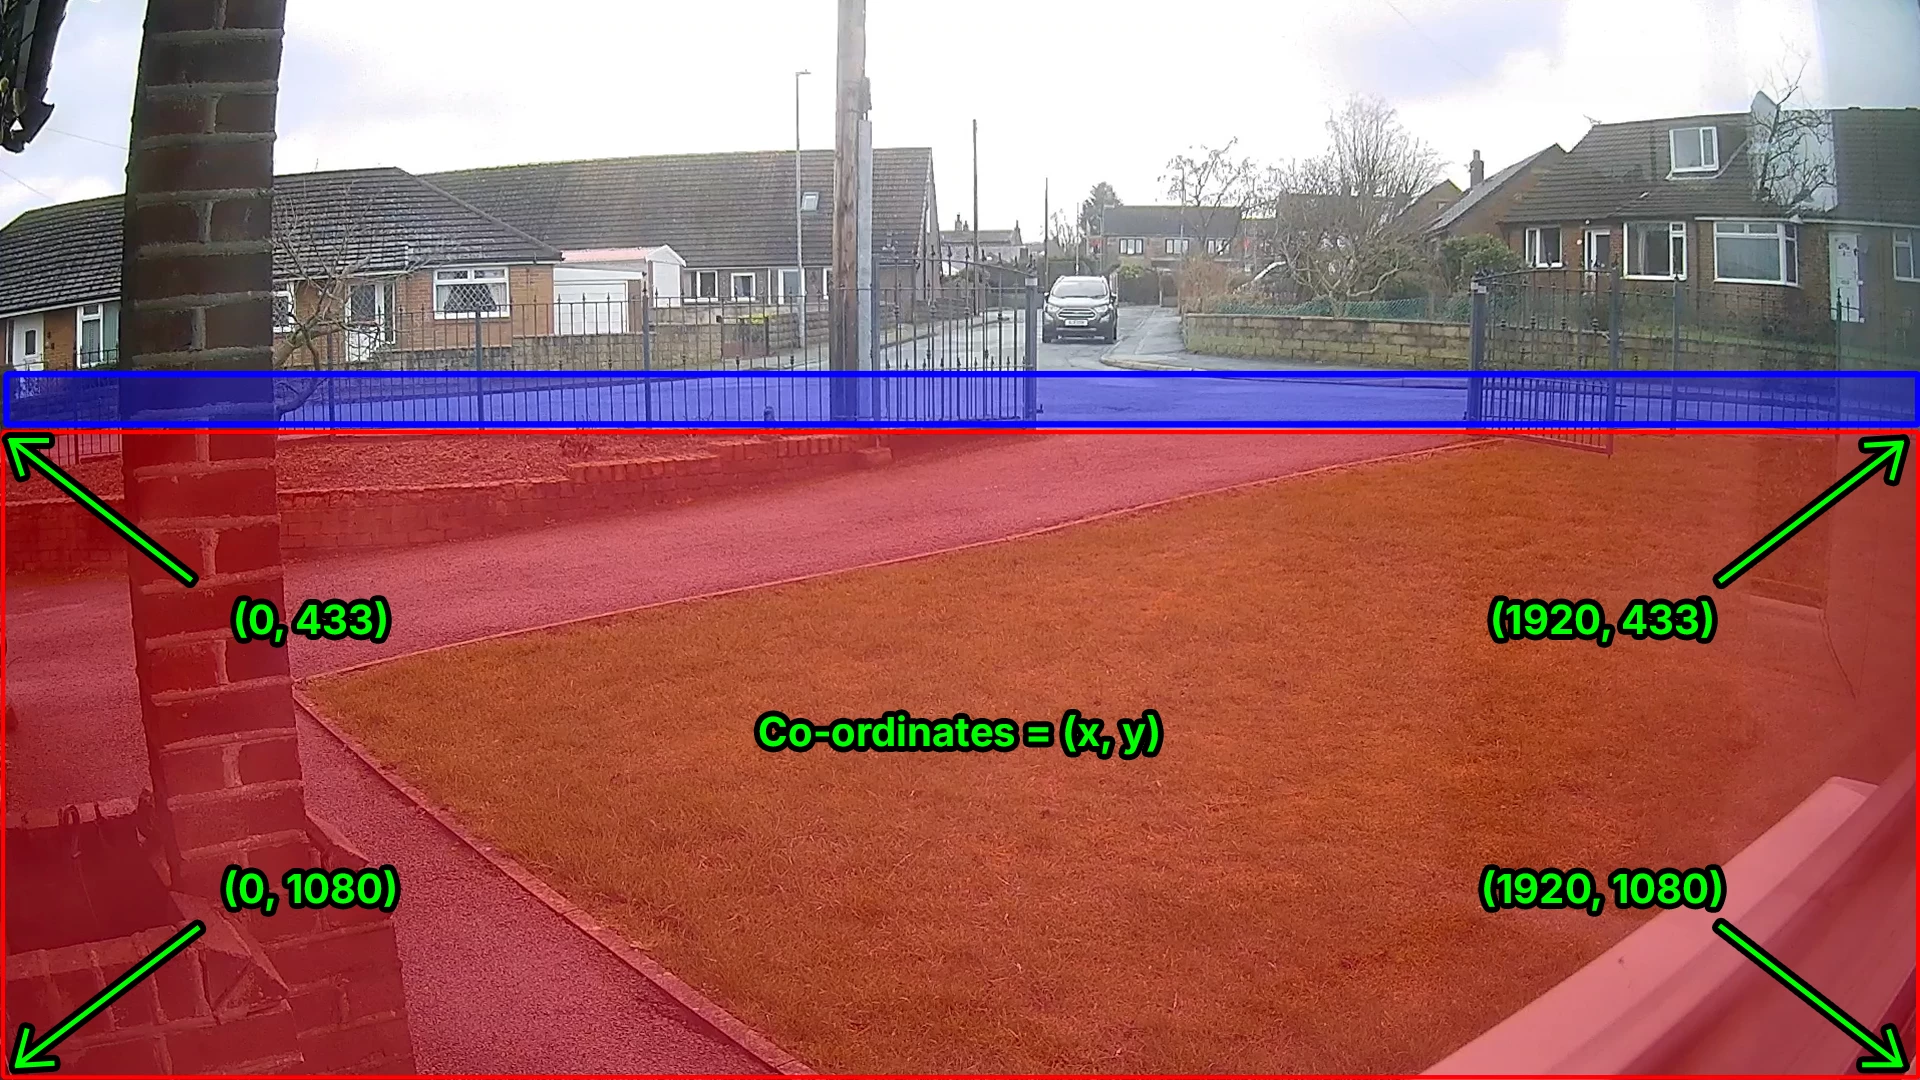
In my setup, it looks like this:
- RED zone (driveway, inside the property boundary): Starts at y=433 (the fence line) and goes to y=1080 (bottom of the image)
- BLUE zone (road): A 50px horizontal strip from y=383 to y=433
Blue is only a narrow strip to avoid detecting cars parked further up the road. We detect objects when any part of the bounding box enters a zone, rather than waiting for the entire object, because a whole car wouldn’t actually fit inside the narrow blue detection zone.
Update the Zone Coordinates
In metis_ha_detector.py, update the zone definitions based on your measurements:
# RED ZONE: Adjust the y-coordinates based on your boundary line
FRONT_RED_ZONE = np.array([
    [0, 1080],      # Bottom left
    [0, 433],       # Top left
    [1920, 433],    # Top right
    [1920, 1080]    # Bottom right
], np.int32)

# BLUE ZONE (optional - comment out if you don't need parking detection)
FRONT_BLUE_ZONE = np.array([
    [0, 383],       # Top left
    [1300, 383],    # Top right (adjust to exclude areas)
    [1300, 433],    # Bottom right
    [0, 433]        # Bottom left
], np.int32)
For the BLUE zone parking detection, there's additional logic: it tracks each car's position over time. If a car moves more than 30 pixels between frames, it's considered "not parked" and the timer resets. Only cars that remain stationary for 4+ seconds trigger an alert. That way, a slow moving car within the blue zone doesn’t trigger a parking alert.
Part 4: Adding More Cameras
This scales pretty easily, and it’s the main reason that offloading inference to something like the Metis Compute Board is an advantage. You can add a lot more cameras (which I intend to do). In the Python script, add your camera URL:
THIRD_CAMERA = "rtsp://admin:PASSWORD@192.168.1.12:554/path/to/stream"Add it to the sources list:
stream = create_inference_stream(
    sources=[FRONT_CAMERA, BACK_CAMERA, THIRD_CAMERA],
    ...
)
Create a processing function (copy process_back_camera as a template) and add to the main loop:
elif frame_result.stream_id == 2:  # Third camera (zero-indexed)
    process_third_camera(frame_result.detections)
In Home Assistant: add another webhook automation and snapshot shell command for each new camera.
Part 5: How It All Connects
Here's what happens when someone walks in front of a camera:
- Frame captured (every ~33ms at 30 FPS): Voyager SDK pulls from RTSP stream, GStreamer decodes H.264
- AI inference (~20-30ms on Metis AIPU): YOLOv26s runs on AIPU cores, returns bounding boxes, class labels, confidence scores
- Zone checking (<1ms on CPU): Python script checks if bbox overlaps with defined zones
- Webhook sent (~10-50ms): POST request to Home Assistant with JSON payload
- Home Assistant responds (~1-2 seconds): Receives webhook, waits 1 second for person to fully enter view, ffmpeg grabs high-res frame, sends notification
Total time from detection to phone notification: about 2-3 seconds. Fast enough to catch someone at the door well before they knock. I actually had to introduce a slight delay in the Home Assistant automation before taking a snapshot, because the whole thing runs so quickly people weren’t in full view of the camera before it had grabbed an image and sent it to my phone!
I split responsibilities this way because Metis does what it's good at (fast AI inference) and Home Assistant does what it's good at (automation logic, notifications, storage). The webhook approach means the MCB just says "I saw a person" and HA handles the rest, including any additional automations you might want (turning on lights, etc.).
Performance
- ~30 FPS combined
- ~196ms average latency (min: 85ms, max: 375ms)
- CPU usage: 20-25%
- Metis core temps: 31-32°C
- Zero thermal throttling
Compare that to running it all on the RPi5 CPU: constantly running the fan, way higher CPU usage and temperature, more power consumption, limited headroom for adding cameras.
Wrapping Up
This setup's been solid so far. The RPi5 is relaxing, the MCB barely warm, and I'm getting reliable notifications with great snapshots. Zone detection works well for filtering false positives (although it still needs a little tweaking), and it's far better than the camera's built-in motion detection which pings every time a cloud passes overhead or a blade of grass moves.
The Voyager SDK supports cascaded pipelines for more advanced use cases like licence plate recognition, so there's plenty of room to extend this, too.
If you build something similar or improve on this, please share it here! Code's on GitHub if you want to fork and improve it.