Introduction
The Automatic Number Plate Recognition (ANPR-for-All) project is intended to simply provide an easy-to-use vehicle license plate detection system for building into all manner of solutions. For instance, you may wish to register certain license plates for automatically opening gates, such as for emergency services or for security, or for displaying alerts on an LCD screen when certain vehicle license plates are detected.
Check out the video here:
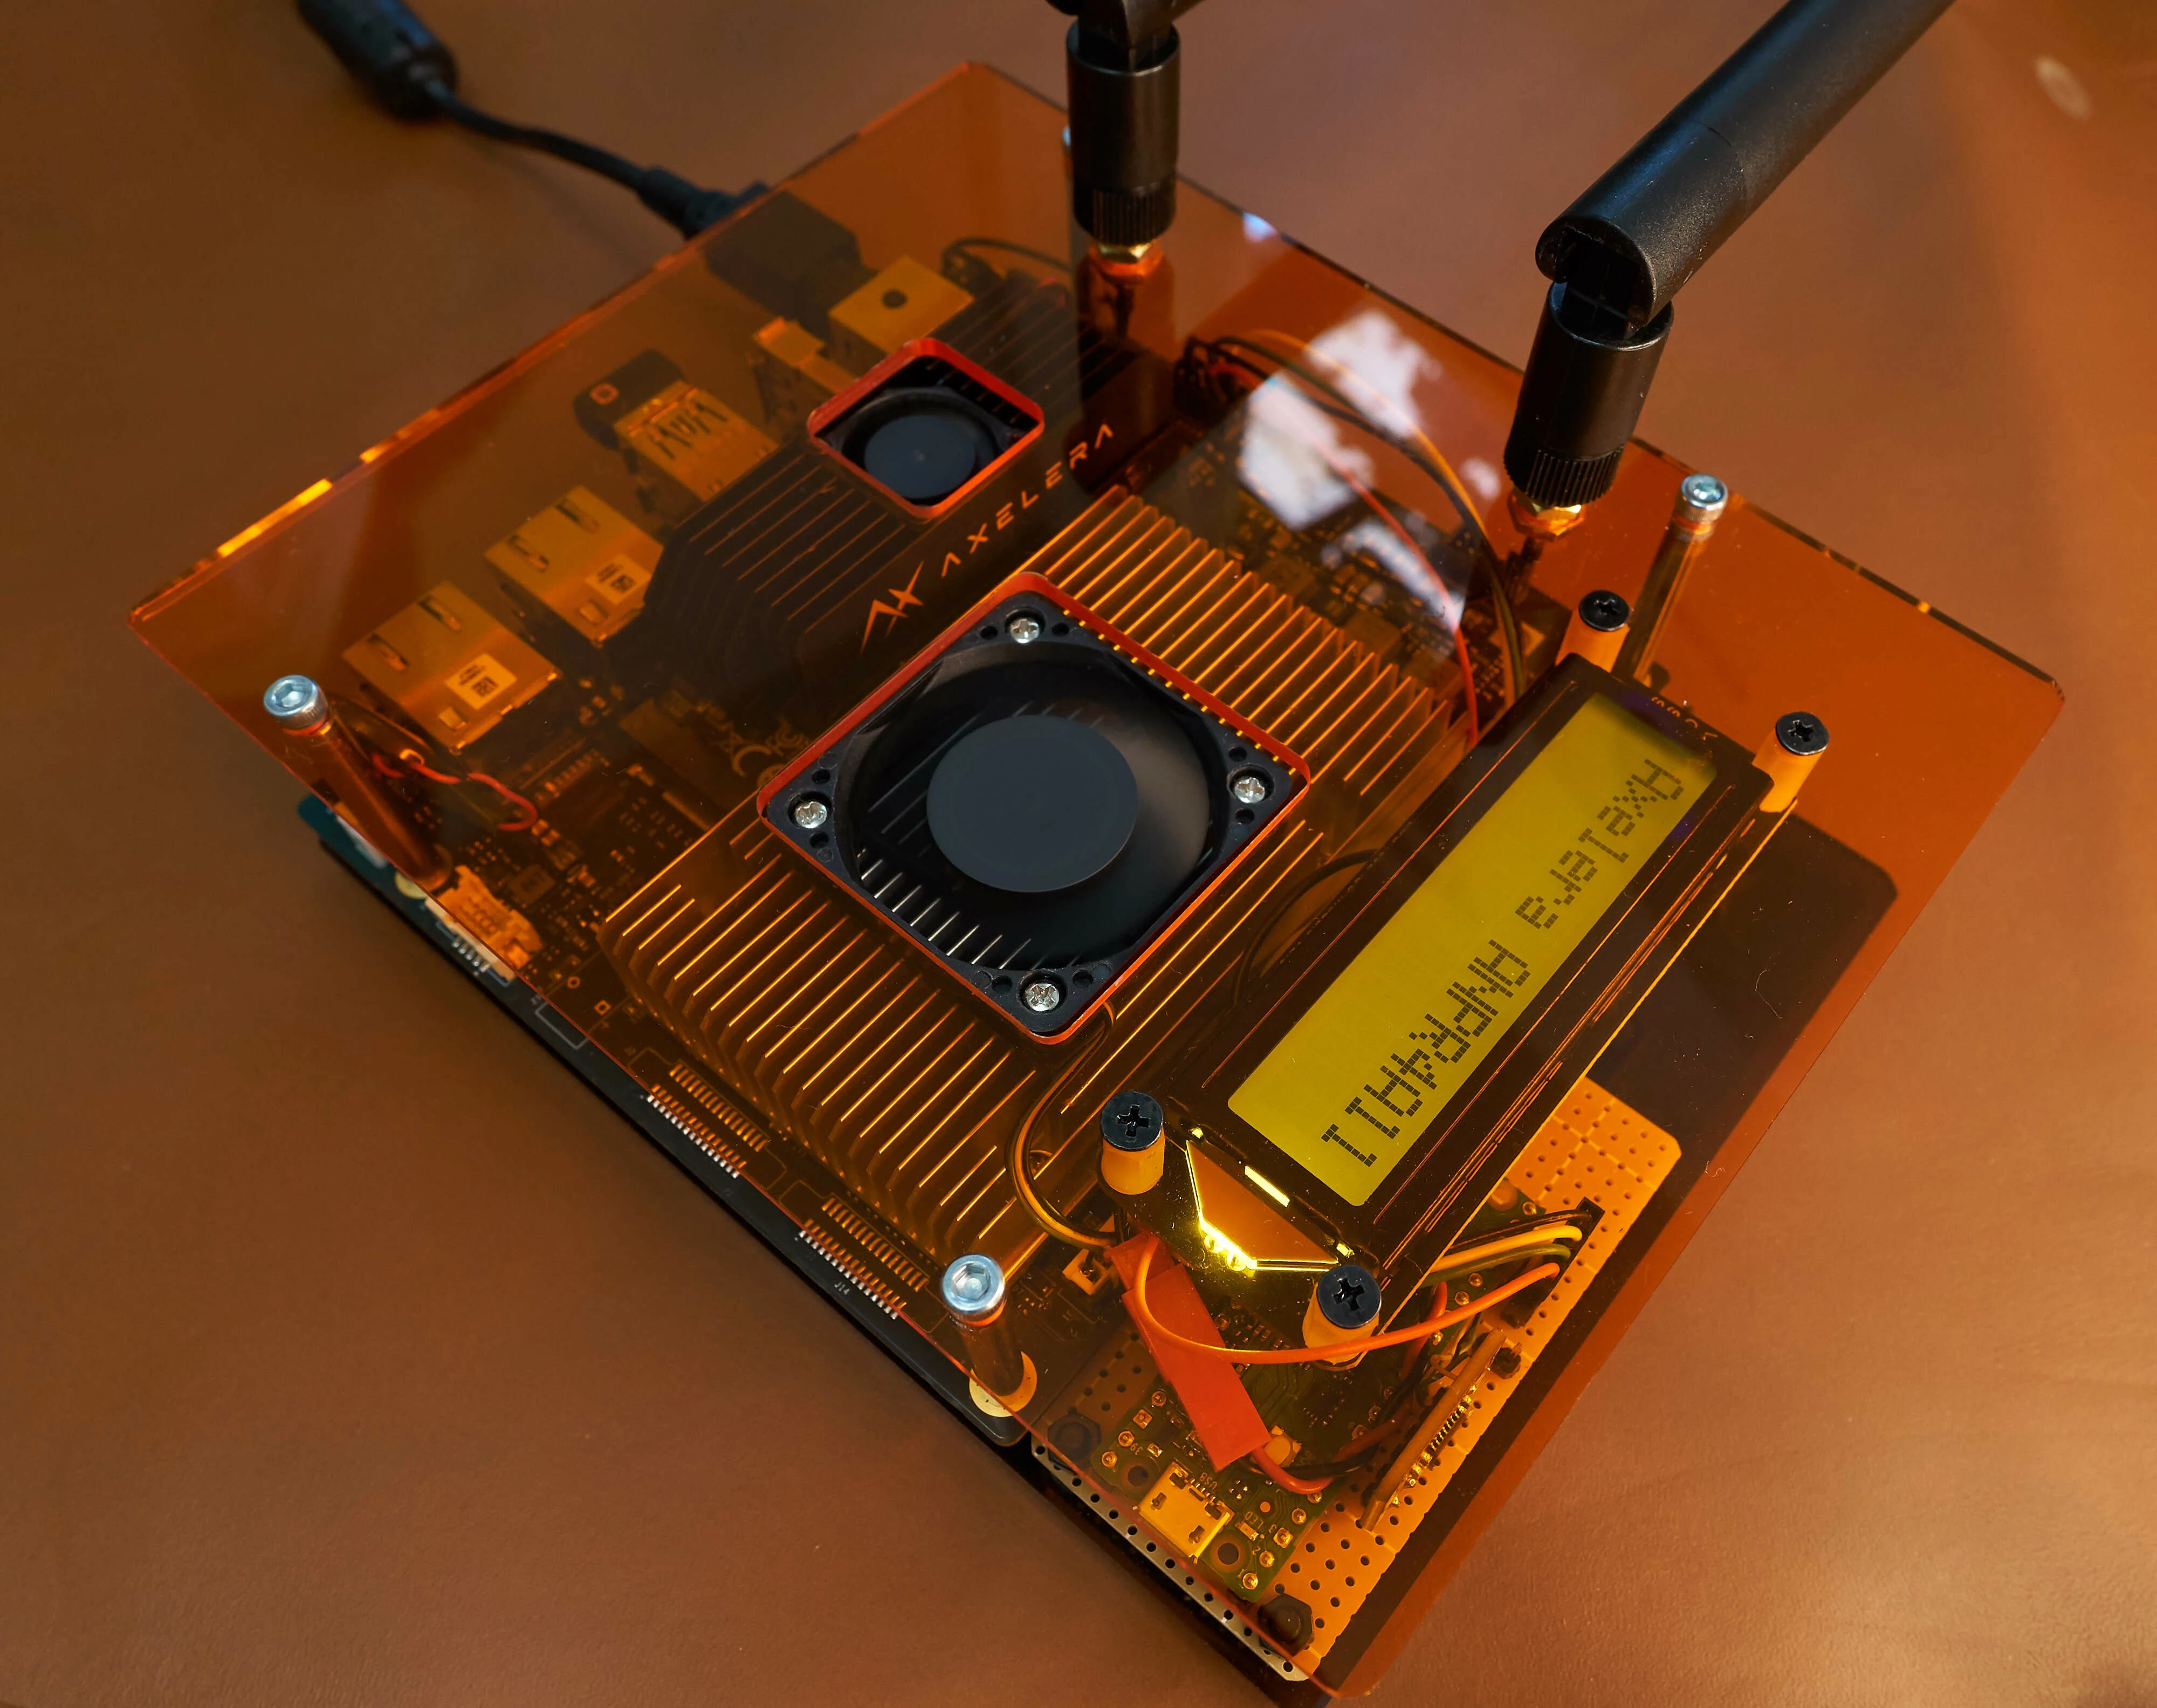
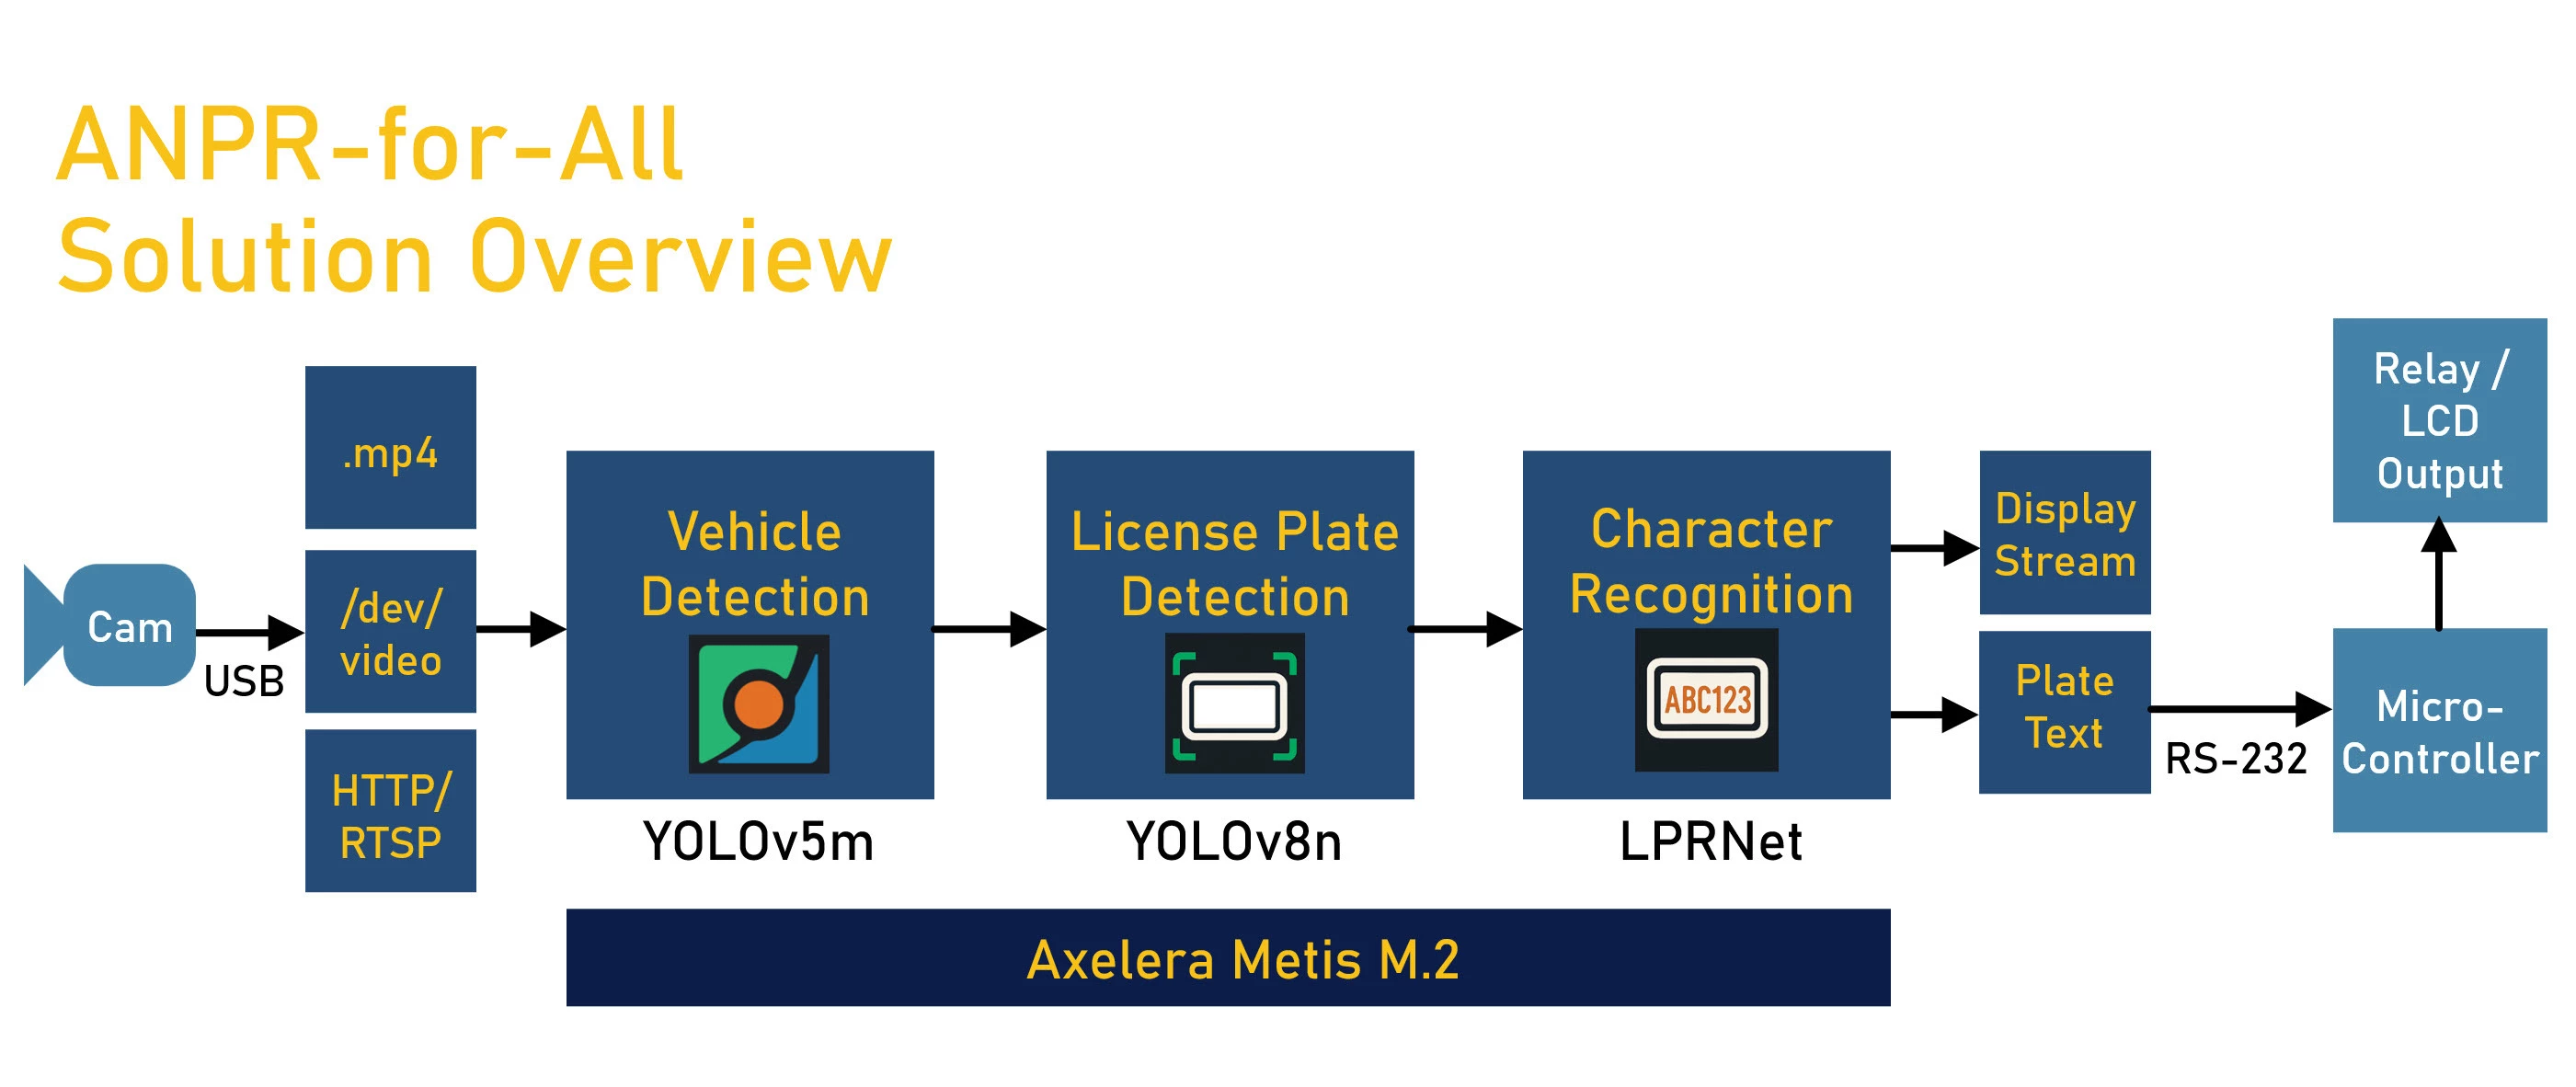
To get there, I had a rather nice Axelera Metis M.2 Artificial Intelligence Processing Unit (AIPU) in an M.2 form-factor (you can see it toward the top of the photo above), installed on a Linux single-board computer (SBC). The idea was to feed in video source streams, and use the Metis AIPU to execute an AI pipeline to manipulate the video stream as appropriate to run it through neural networks for vehicle and license plate detection, ultimately performing character recognition all within that pipeline running on the AIPU, and then use that to control external systems such as electronic gates.
How did it go? Quite well! Although I ran out of time, I managed to fill in most of the building-blocks below; technically this won’t be the final blog except for the purposes of this challenge, and I’ll publish the remainder within the coming weeks.
This blog post describes everything that was achieved, in hopefully enough detail that anyone can replicate and build on the work. There is an accompanying project GitHub repository.
Setting up the Linux System
The Metis M.2 Evaluation Kit comes with an Aetina SBC pre-installed with Ubuntu Linux and the Metis AIPU’s software development kit (SDK) called Voyager.
The Linux environment is already set up with the superuser (root) account of course, but also a user account called aetina. The aetina account is used with the Voyager SDK.
You’ll need to install additional storage, which could be a microSD card, or an M.2 Solid-State Drive (SSD). Plus, to make life easier, a Wireless Local Area Network (WLAN) card can be optionally installed. The SSD and WLAN details are here.
Running a First Demo
The SBC has a HDMI video output that can be connected to a TV or monitor. If you’re logged in to the SBC remotely and not from a directly attached USB keyboard, then you’ll need to type the following (as the aetina user) to be able to direct video applications output to the HDMI attached monitor:
xhost +SI:localuser:aetinaNext, just follow the Quick Start Guide.
The SDK is installed by default in the /axelera/voyager-sdk folder, and if you go to that folder, you’ll see that as part of it, it includes its own Python packages and environment in a sub-folder called venv. You can enable that Python environment setup by typing:
source venv/bin/activateFrom here on, running a first demo is literally just a single command away:
./inference.py yolov5s-v7-coco media/traffic1_1080p.mp4The above command executes a object detection model known as YOLO which has been fine-tuned in its training with a fairly large set of images known as the COCO dataset. COCO offers around 80 different object categories including various household objects, pets and animals and so on, but also, importantly, cars, trucks and motorcycles! For a first stage, the YOLO object detector with that dataset would work fine; one would simply ignore all categories apart from the desired vehicles.
When the above command is run, you’ll see a video stream appear on the monitor, with bounding boxes drawn around the detected objects.
If desired, a real camera feed can be used, by attaching a USB webcam to the SBC, and it will appear within Linux as a video interface (better known as a device file) called /dev/videoN (it was /dev/video20 in my case). If you’re unsure what your precise device file name is, I created a find_camera.py script that will search for it and print it.
python ./find_camera.py
Camera with name containing 'HD Pro' found as /dev/video20
By the end of this first demo, I pretty much had everything I needed for the first stage of the ANPR-for-All system!
Obtaining a Dataset
The plan was to feed the output of each stage into the next, i.e. build a cascade of detectors/classifiers. The first stage has already been discussed. For the second stage, I wished to again use a YOLO model, but this time one tuned for license-plate detection. To do this training, I needed a load of realistic license-plate images, and the co-ordinates of the bounding boxes for them within the images.
You can register on RoboFlow for free, and search for an appropriate license plate dataset. I found a license plate dataset with 2156 images. I clicked on ‘Dataset’ in the left pane. To the right, several versions were listed, I happened to choose the one named ‘8-2’.
To the right of that, I clicked the ‘Download Dataset’ button, and selected the TXT YOLOv8 format, and downloaded it as a zip file.
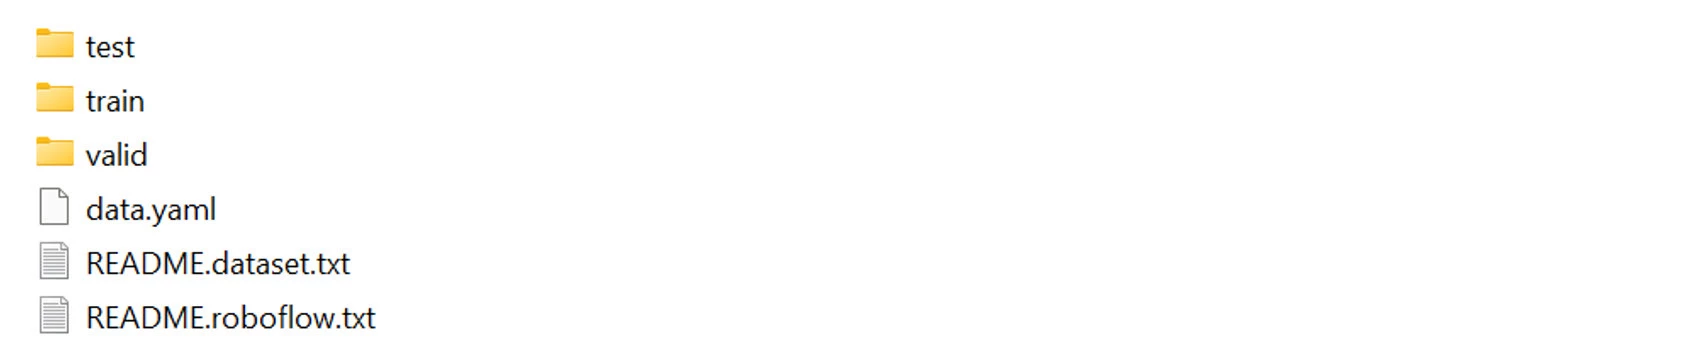
On a PC (I did it on a server using Amazon Web Service [AWS], because my PC didn’t support it), unzip it somewhere. You’ll see that it contains folders each containing images and labels, plus a .yaml suffixed file describing the folder names plus some minor metadata.
Adding Custom Images to a Dataset
If desired, to improve it, you could add to the images, literally by taking loads of photos, perhaps from a video captured on your mobile phone. If you google, you’ll find commands to extract images from videos, using ffmpeg; an example command I used is shown below, but you can vary it depending on how long the video capture is, and how many images you want.
ffmpeg -i traffic.mp4 -vf fps=6 frames/frame_%04d.jpgThe process to manually draw bounding boxes and putting the co-ordinates into the label files can be laborious. There are online tools to help. I wrote a basic one; to use it, place the Python file in your images folder, and then run it:
python ./image-editor.pyAll the images will be listed in a little window. Double-click to select one, and then in the main photo window, you can pan the image, crop, resize, and set a bounding box, all using keyboard shortcuts (see the comments at the top of the Python file for the detail). When the bounding box is drawn, the image editor will automatically save a text file with the co-ordinates, in the labels folder.
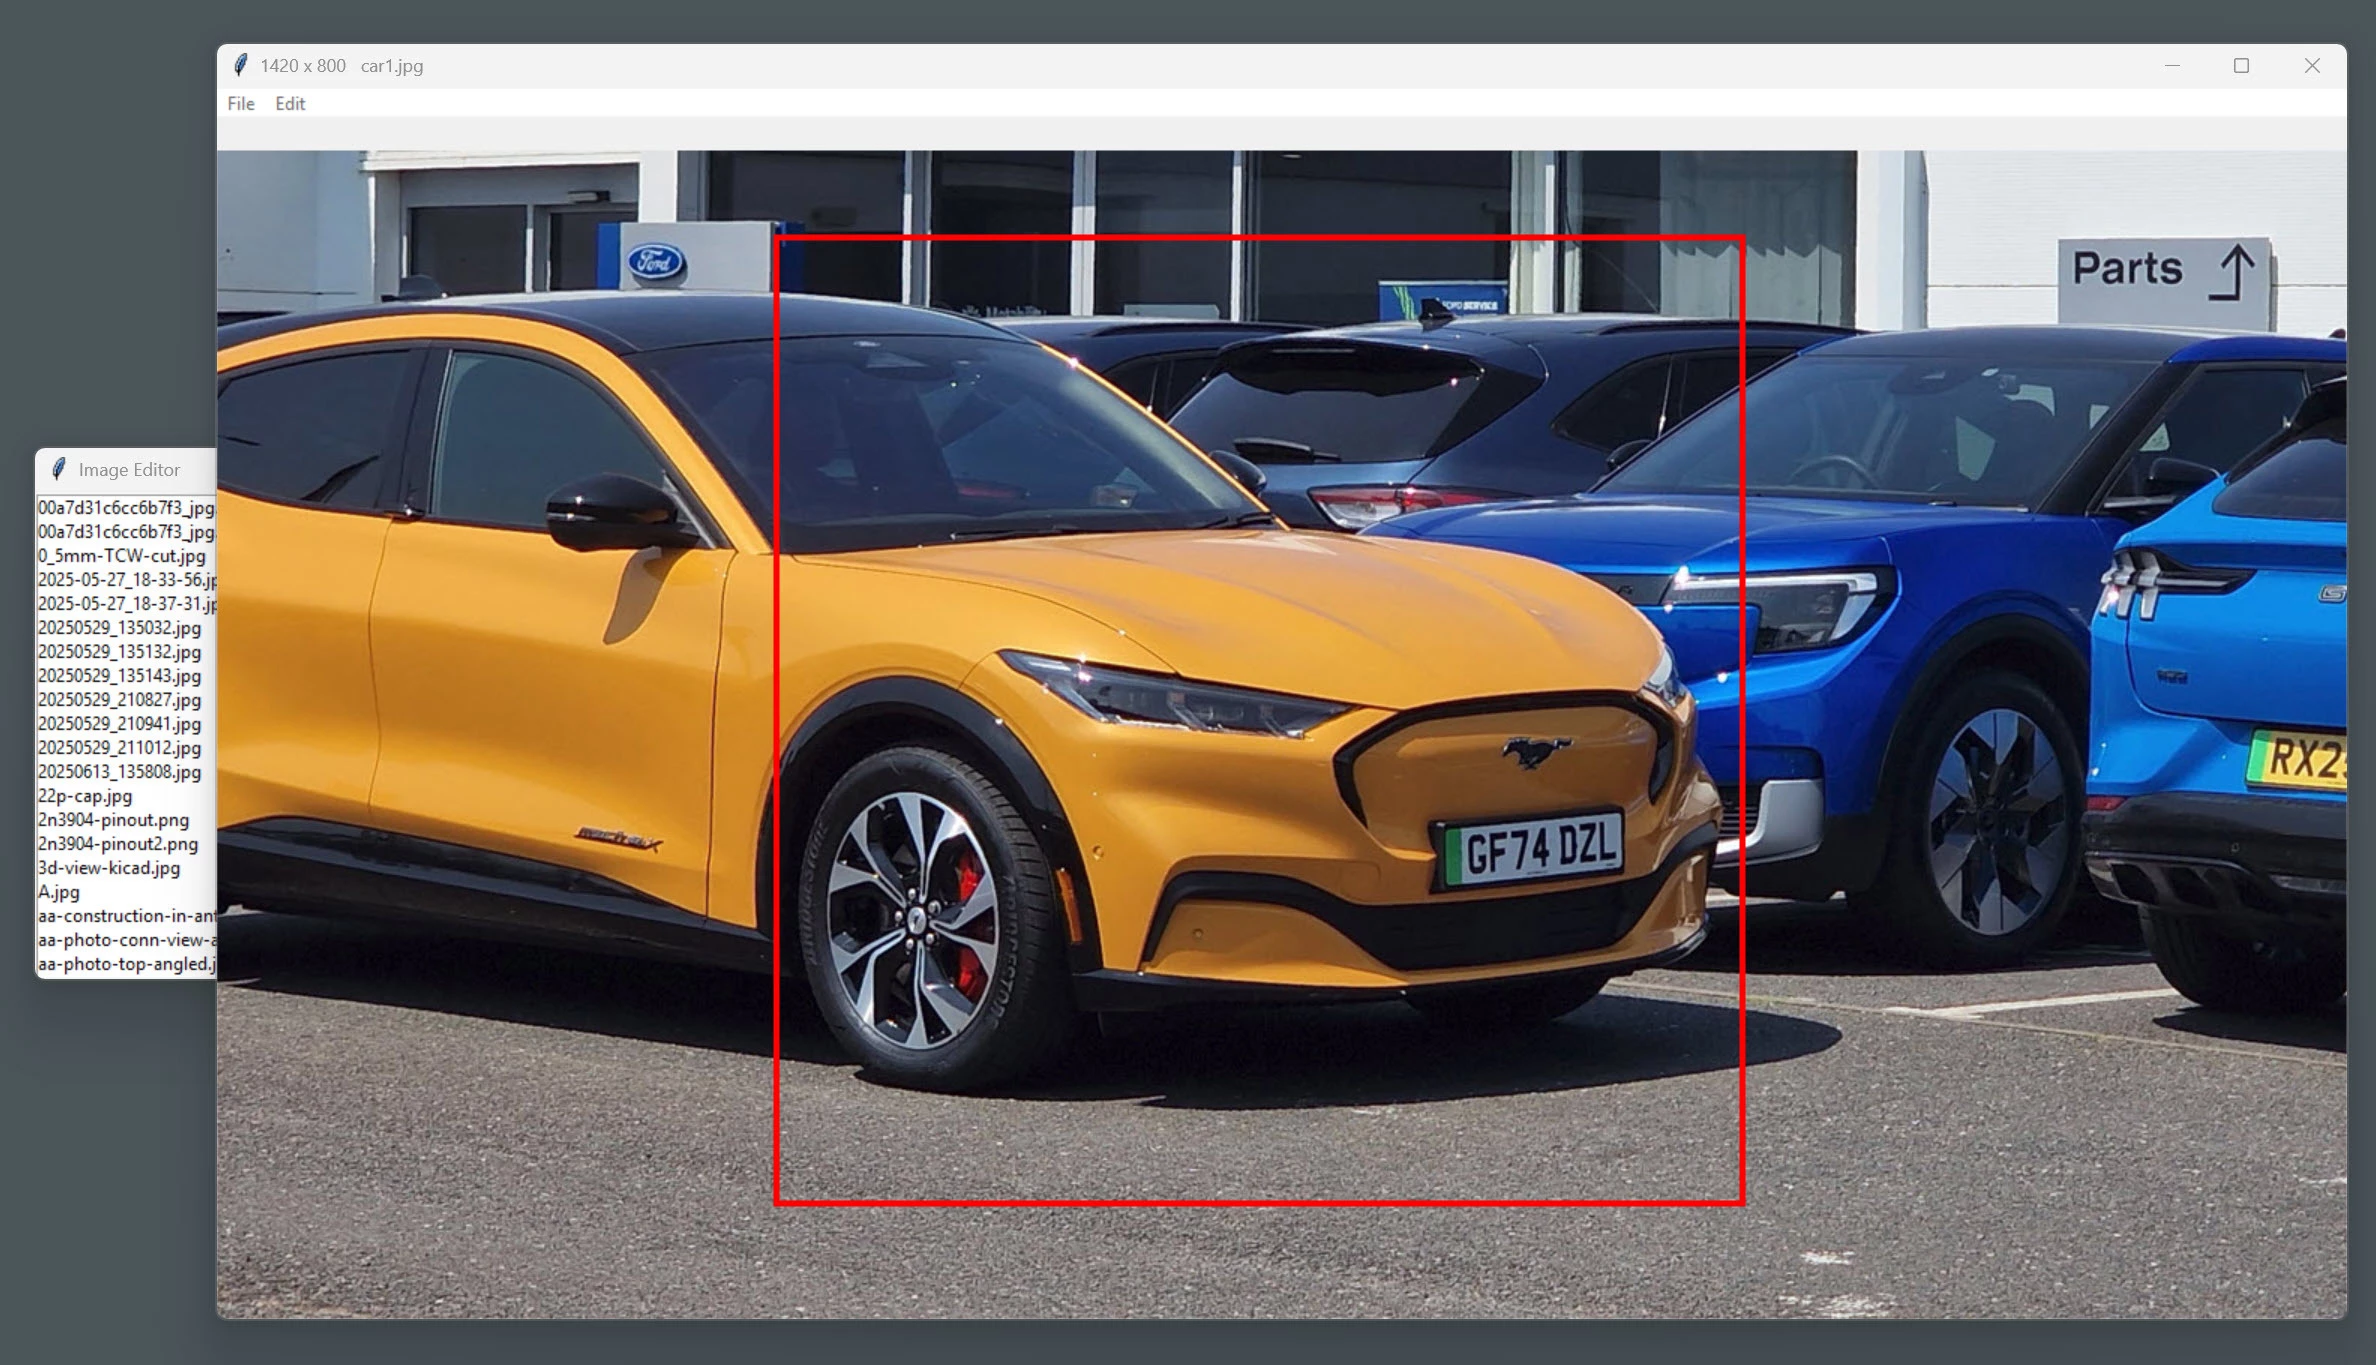
The program is very basic, and there’s a bug, the first time you click on a filename, another file list window appears (just kill that window). I’ll improve the software some other time, since it’s not a showstopper. I find this simple editor really speeds up the process, but there’s plenty of scope to build on it. If you get the chance to improve it, please submit a pull request on GitHub.
Fine-Training the YOLO Model using the Dataset
This is pretty straightforward, but be prepared to spend many hours, depending on compute resources.
pip install ultralytics
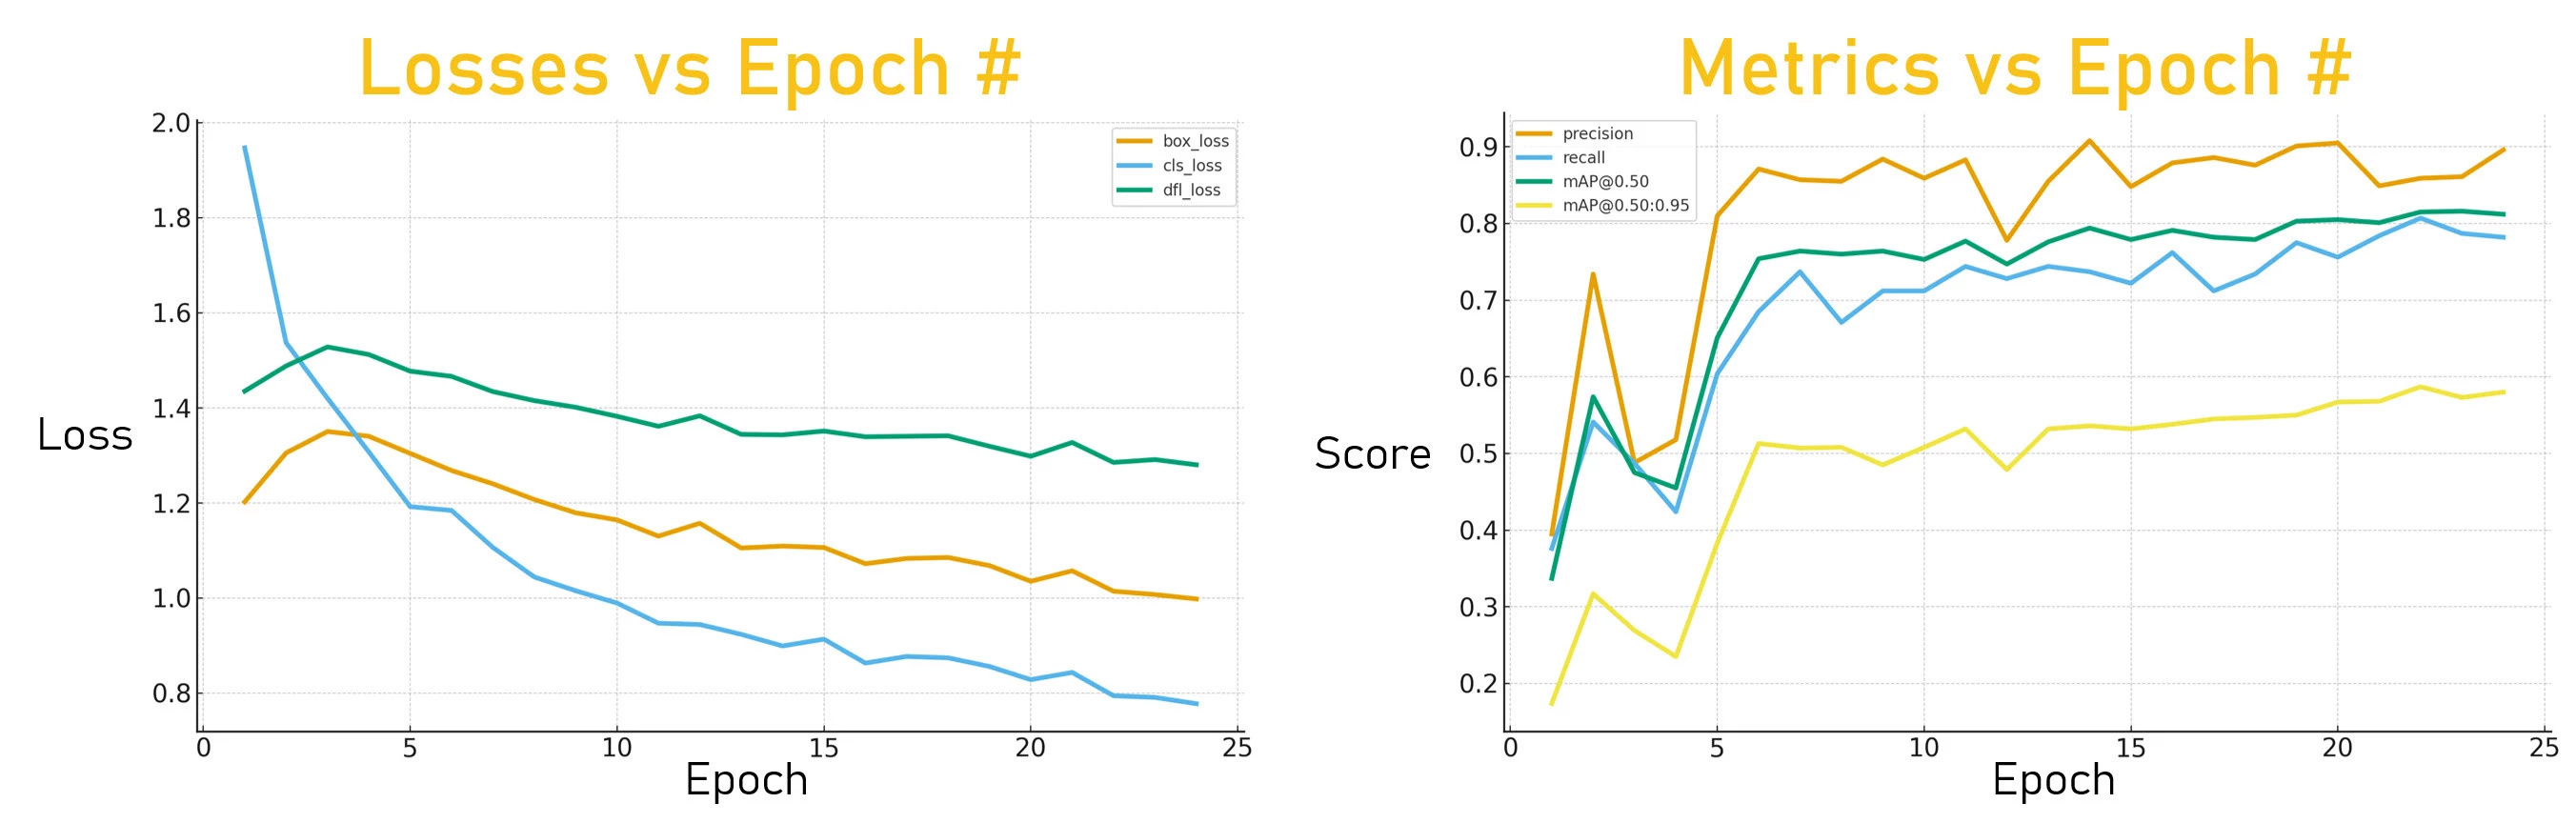
yolo detect train data=data.yaml model=yolov8n.pt imgsz=640 epochs=50The above command will process through all the images up to 50 times, but you can press Ctrl-C to quit earlier if desired.
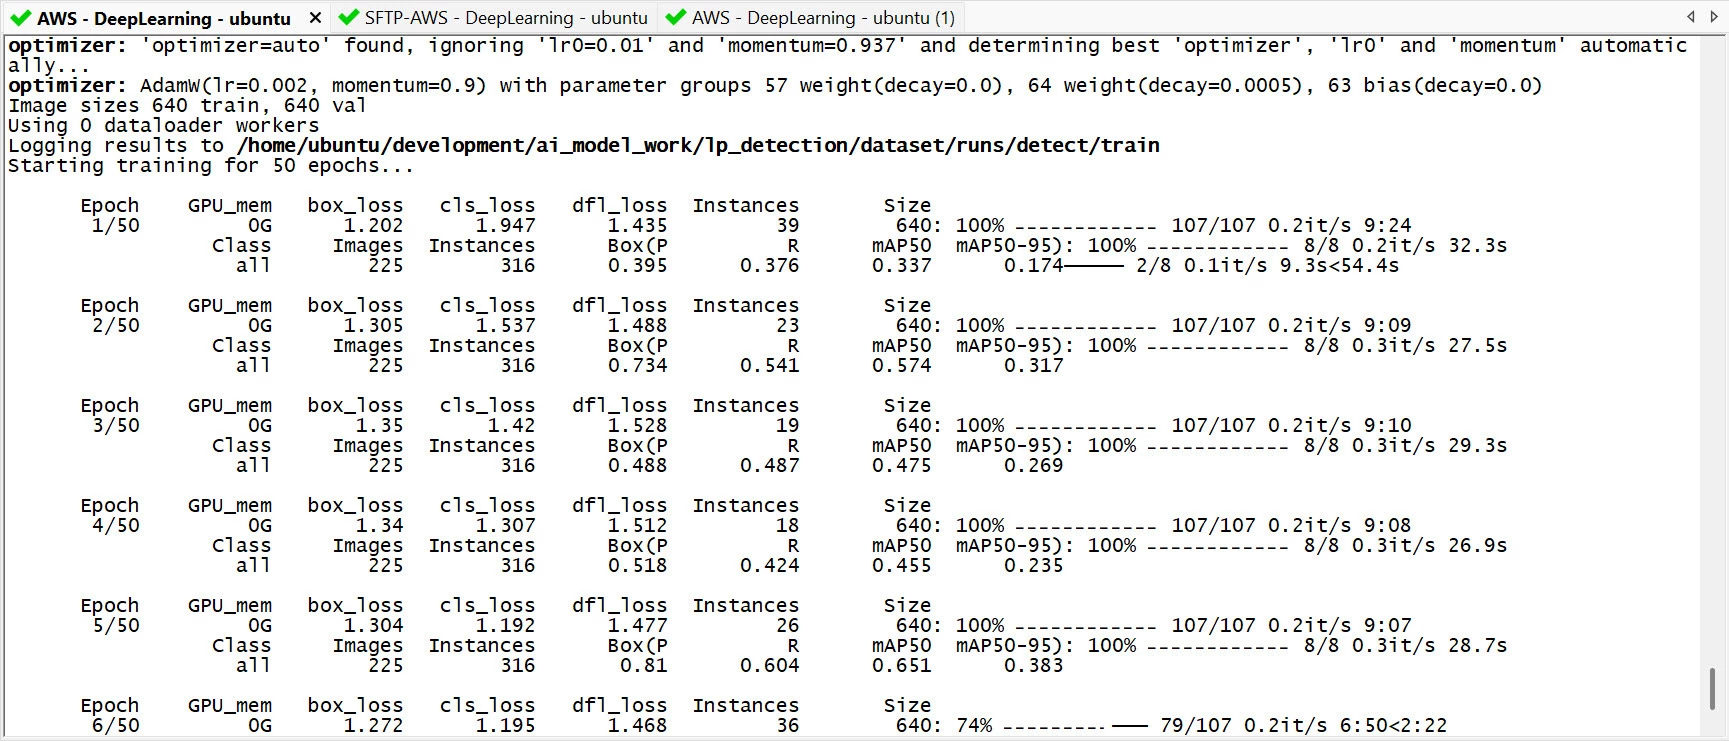
As the model is being trained, you can look at the statistics output at each epoch, to see how effective the training is.
The values to look at are three loss values called cls_loss, box_loss and dfl_loss, and two metrics (Average Precision metrics) known as mAP50 and mAP50-95.
The three loss values in the order mentioned above are an indication of the error during classification, and bounding boxes error course and precise, respectively. All three should trend down in each epoch.
The two AP metrics concern the bounding boxes, and should increase in each metric. The mAP50 metric is less strict, and will have a higher value than the mAP50-95 metric.
Once all the loss values and metrics have levelled off, there’s no need to continue the epochs, but there’s no harm, since the best resulting model will be selected regardless.
Exporting the Model
The model can be converted to a standard format called Open Neural Network Exchange (ONNX) that the Voyager SDK can understand. I typed the following:
yolo export model=lp_yolov8n.pt format=onnx imgsz=640 opset=12 dynamic=False nms=TrueThis will result in a .onnx suffix file that can be copied onto the SBC. The folder to place it in is /axelera/voyager-sdk/customers/lpr_community
Configuring the Pipeline
To summarize so far, two object detection models need to be cascaded; the first is fine-tuned on the COCO dataset and can detect vehicles, and the second can detect license plates.
What’s neat is that entire pipelines can be defined in a single human-readable file; no code! The Voyager SDK can use a configuration file in order to construct the pipeline for the Metis AIPU. The pipeline configuration is in the form of a YAML file; if you’ve never seen YAML, it’s a simple text format that can make sense just from visual examination of it, however the syntax and indents matter, so some care needs to be taken when creating or modifying YAML files. There are example cascade pipeline config YAML files to explore. However I needed a bit of help, and the Axelera staff at the Axelera Community website helped me out.
In the end, I used the existing face-recognition-with-vote.yaml file as a guide, along with the Community support. Once complete, the file was placed at the same location as the ONNX file (/axelera/voyager-sdk/customers/lpr_community).
To validate the YAML file, the command make help can be issued, and it will list perhaps 200 YAML files, hopefully including the new one!
Compiling the Models
The Voyager SDK comes with a deploy.py script that will compile up the models in the YAML pipeline configuration file. I typed:
./deploy.py vehicle-plates-reference-designAfter about half an hour, it was complete. It results in a sub-folder in the build directory, containing low-level binary files and configuration data for the Metis AIPU.
Running the Pipeline
The entire pipeline was actually designed in the YAML file already discussed, and we’ve compiled the models in that pipeline. All that remains to get that functioning, is to launch it and attach a video source! There’s a ready-made example program called inference.py (used in the earlier demo), which can simply be reused for now as a test. The switches for inference,py are documented here.
./inference.py vehicle-plates-reference-design media/traffic1_1080p.mp4 --frames=3000 --disable-vaapiI crreated a program called myapp.py based on inference.py, so that I can extend it. Upon startup, it calls find_camera.py to locate the device file for the video camera, and then calls the Voyager SDK function create_inference_stream, simply specifying the pipeline name and the video source.
stream = create_inference_stream(
            network="vehicle-plates-reference-design",
            sources=[
                “usb:20”
            ]
        )
The stream handle is then passed into an video output thread which is responsible for dealing with the output results, for instance to display frames.
Adding a Third Stage
The third stage can use the LPRNet model supplied with the Voyager SDK. It is trained to recognize numbers and the alphabet, and output a text string. Unfortunately, I ran out of time to add this stage! I will revisit this in the next blog, to finish this project.
Connecting to the Real World
A key requirement was to be able to “act” on the results, so that (for instance) a gate could be opened, or the license plate results could be transmitted to be logged or displayed on an LCD screen, and so on.
I decided to use RS-232, because almost every computer on the planet can offer that; if it doesn’t, it is easy to attach a USB-to-RS-232 adapter, or a USB-to-UART adapter (UART is a similar thing to RS-232 but with different, and inverted, voltage levels).
The Aetina SBC happens to have RS-232 capability built-in. The diagram below shows the required connections (an adapter board, such as Adafruit RS232 Pal will be needed because the microcontroller accepts UART voltage levels, not RS-232 levels).
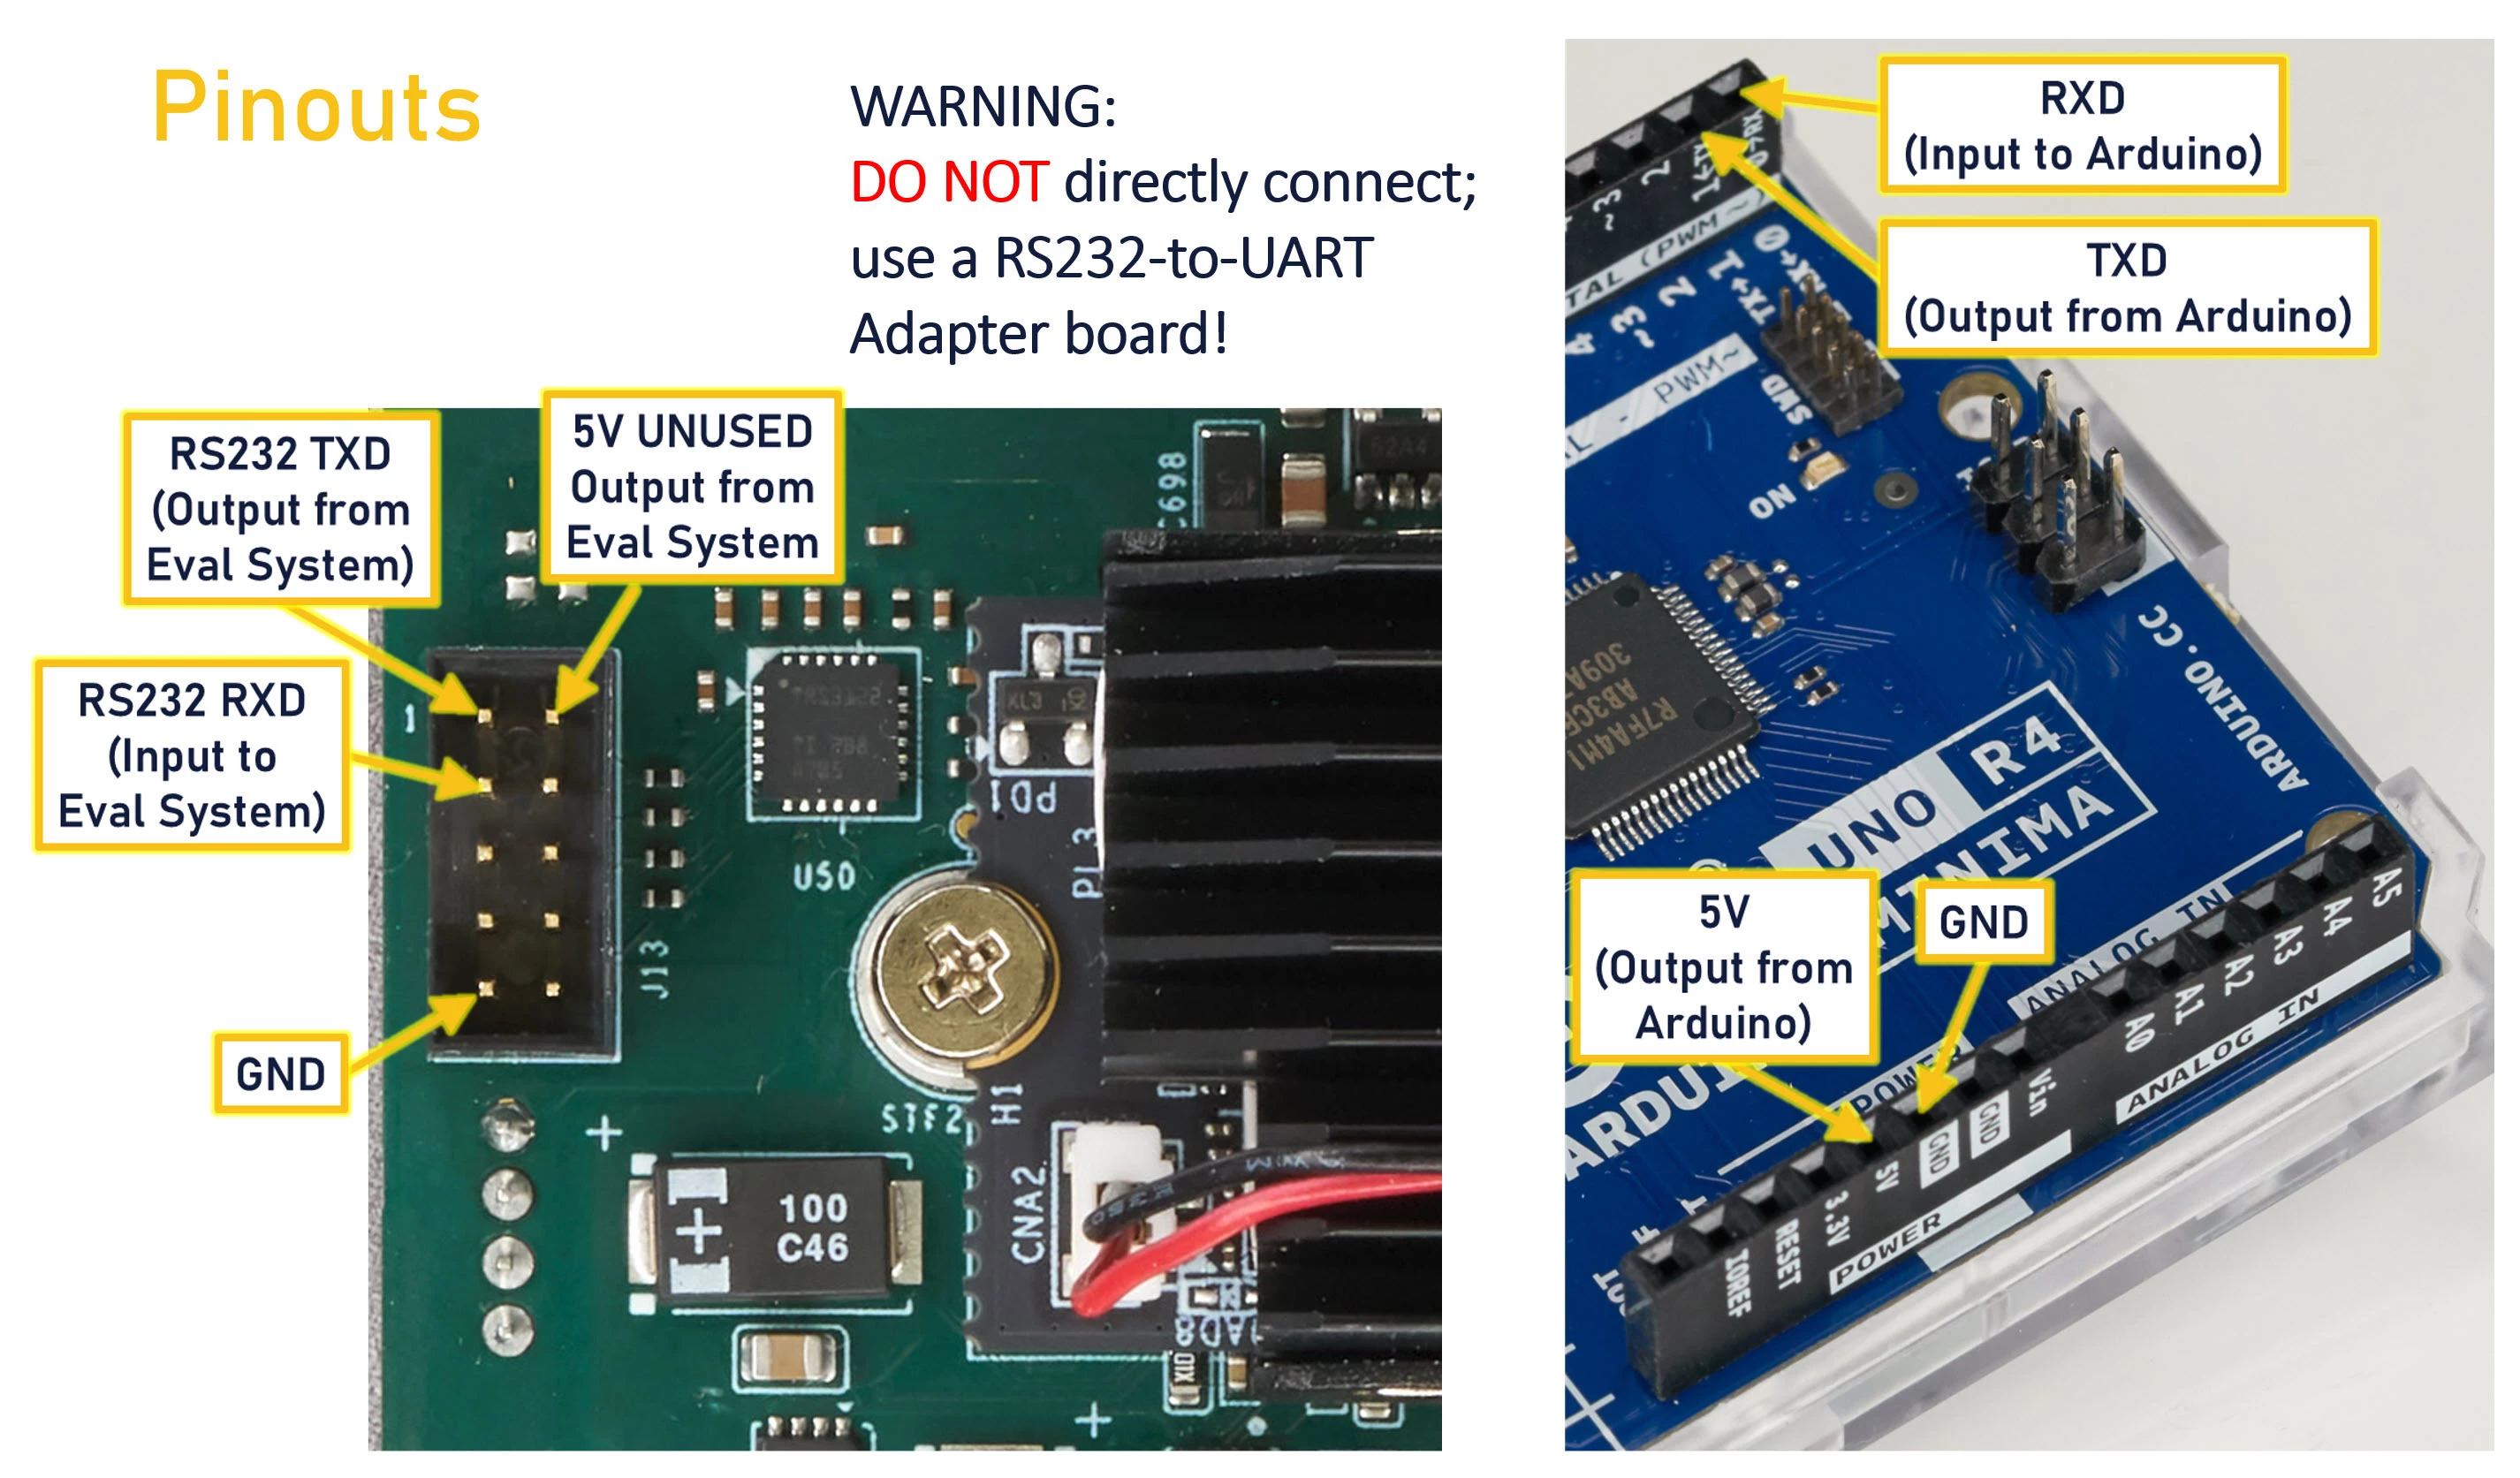
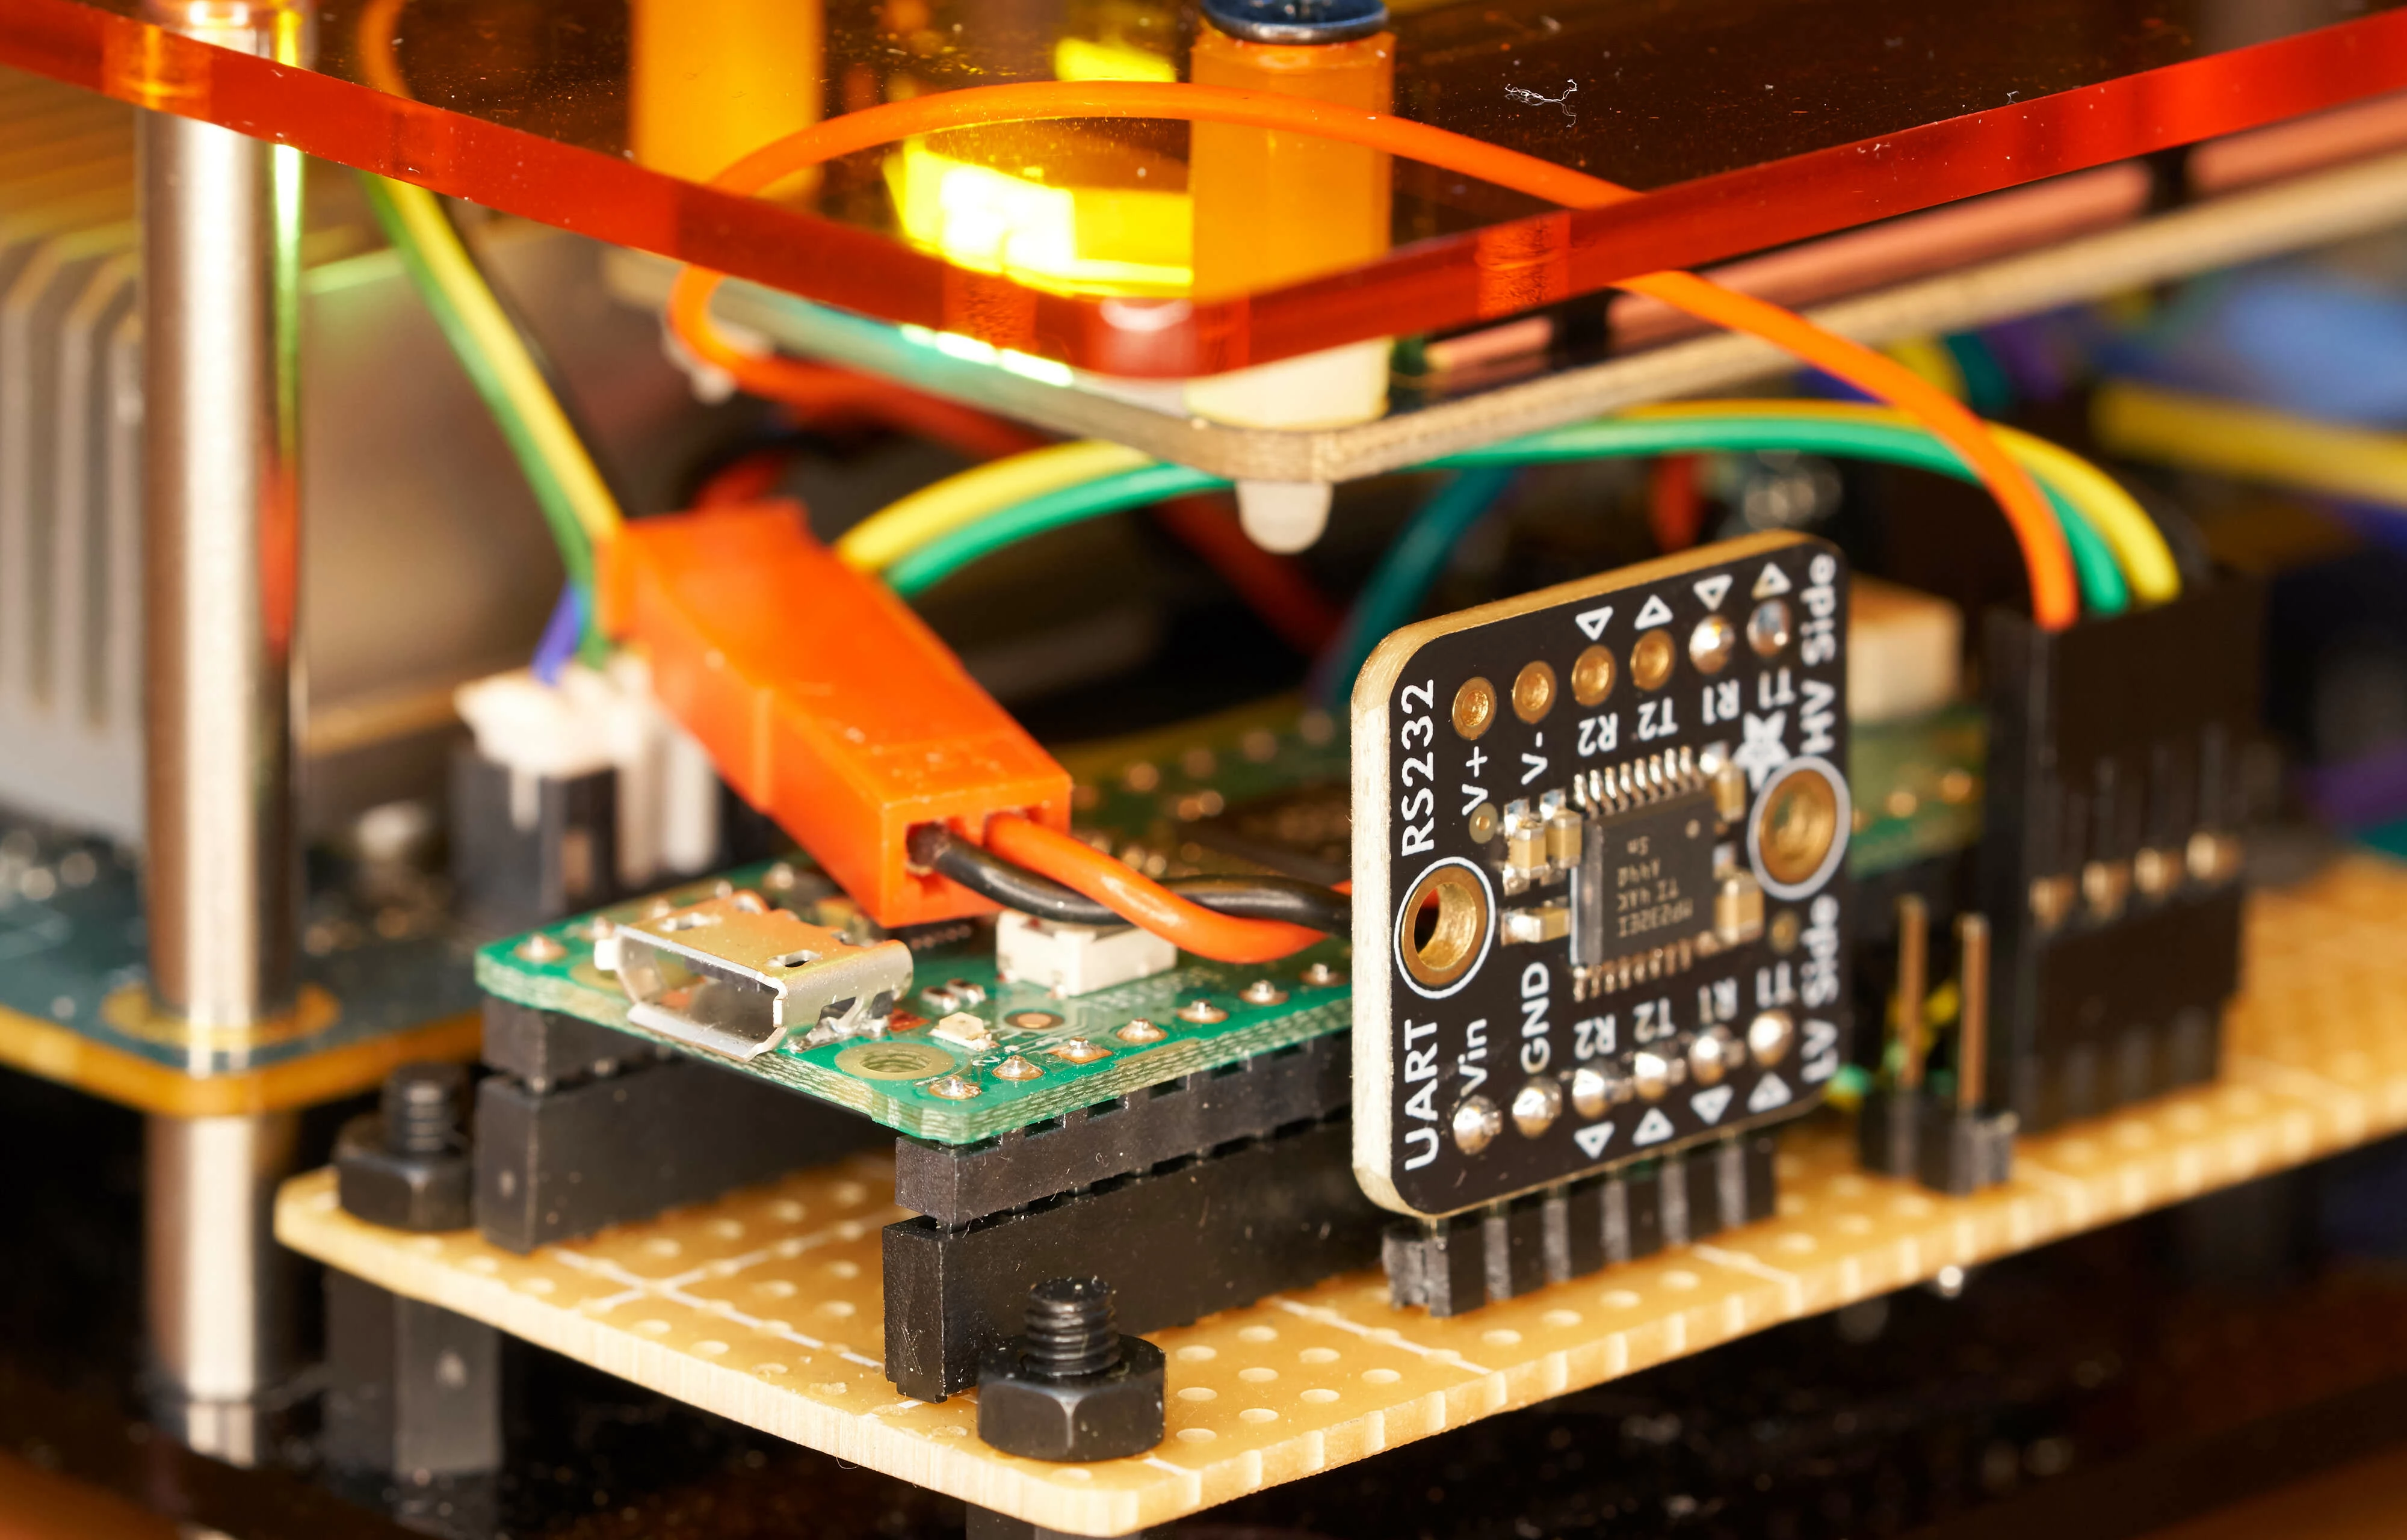
Note: Although the photo above shows an Arduino board, I used a Pi Pico board (it’s a similar thing, just a bit more compact). The code I used is on the GitHub site, it currently displays the license plate onto an LCD screen, but it could equally be used to activate a relay for instance.
The photo below shows the Adafruit RS232 Pal, and the Pi Pico microcontroller just behind it.
To transmit data, use the SerialComms.py program at the project GitHub repository.
For example, to transmit the license plate “ABC 123”, type:
python SerialComms.py "ABC 123"The code accepts any arbitrary text, it doesn’t need to be a license plate, so it can be reused for any project that requires control from the Eval system to external hardware.
Tips / Tricks
If you’re keen on creating projects with the Metis AIPU, I hope the information from this project, and from everyone else’s projects on the site, can help get going.
Here are some suggestions.
- An M.2 SSD is highly recommended for initial development, because you won’t need to worry about storage space at all with it.
- If you’re purchasing for work purposes, then it would be worth purchasing at least two platforms, so that you can speed up the development process. It can naturally take a while to compile models, so having two platforms can allow you to try different things simultaneously and speed up your development time.
- The Voyager SDK model zoo has a ton of models (type make help to see what available) but if you need to do any training yourself, then consider using the higher-performance servers from (say) Amazon AWS, or Microsoft Azure. Note that GPU resources might require approval from the cloud provider.
- Personally I don’t like the noisy fan on the Aetina SBC, but the solution for development was straightforward; I placed it in a different room, and ran a very long HDMI lead to my monitor! (optical HDMI cables are available from Amazon).
I’m looking forward to continuing to use the Metis AIPU, so I’ll add to the list as time goes on, but if you have other suggestions, please do share them : )
Summary
In order to build an ANPR system, it was decided to build a three-stage cascade of models, and the Voyager SDK helped in a number of ways:
- The vast amount of supplied models meant that two of the three stages were literally off-the-shelf!
- The pipeline can be constructed with no code; everything can be described in a YAML file
- The Python code supplied with the SDK proved to be sufficient for testing almost the entire project; and the code was easy-to-understand, to build a custom application
For controlling things, there are lots of methods; RS-232 is one solution that could help.
I have enjoyed getting to know the Metis AIPU and Voyager SDK, and I’m now keen to explore further. I’m really curious to explore the performance, and learn about the Metis architecture to get the most out of it.
The evaluation system as supplied is ready-to-use, but it is recommended to spend some time adding the extra storage space otherwise you’ll definitely run out of space during development.
Check out the project GitHub repository for more detail (or leave a message below!).
Thanks for reading!
Video link: